
Free Cardi Vest Shrug Pattern, Free Crochet Pattern, Free Pattern, Free Sporty Weight Yarn Pattern
Cora Crochet Shrug | Free Pattern Page
Sep
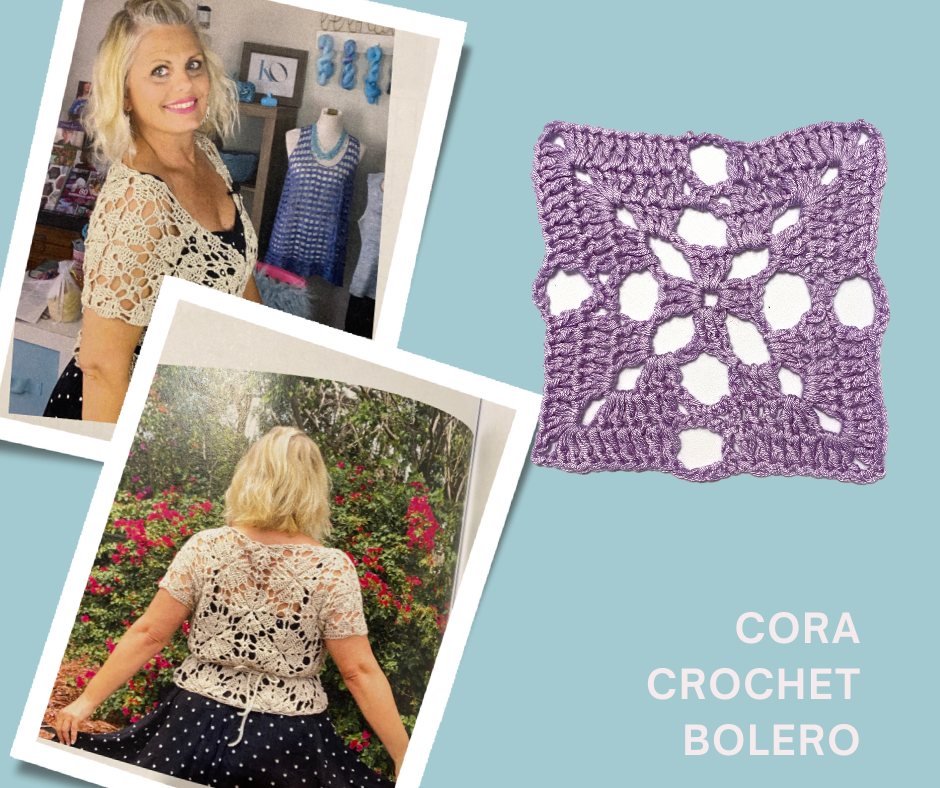
These motifs, once joined together, create a secondary pattern with corner joins which adds a depth to the beauty of the finished fabric. The Cora is a beautiful and elegant layering piece with a figure flattering wrap closure. The level of shaping can be easily adjusted with the ties. Beads or tassels can be added to the ties for extra flair.
Browse more crochet shrug patterns in my 18 Shrug & Cardi Wrap Round Up Here
Download the ad-free PDF pattern here:
Watch the tutorial video here:
What you will need:
-
700 (800, 925, 1064, 1224, 1407) yds or 640 (731, 846, 971, 1117, 1284) m #2 sport weight yarn
Finished Sizes:
Project is 34.5 (38, 42, 46, 51, 56) in or or 87.6 (96.5, 106.7, 116.8, 129.5, 142.2)cm bust circumference to fit S (M, L, XL, 2X, 3X), shown in size M.
Gauge:
Note: Sizing is determined by gauge of square motif.
Square motif = 4 in (10cm) for S and XL using smallest hook
Square motif = 4.5 in (11.5cm) for M and 2X using middle hook
Square motif = 5 in (12.5cm) for L and 3X using largest hook
Stitch Guide:
See glossary for slst, ch, sc dc and tr.
Chain 5 join (ch5 join): Ch 2, slst to adjoining ch5 sp, ch 2
Chain 3 join (ch3 join): Ch 1, slst to adjoining ch3 sp, ch 1
Instructions:
First Square Motif:
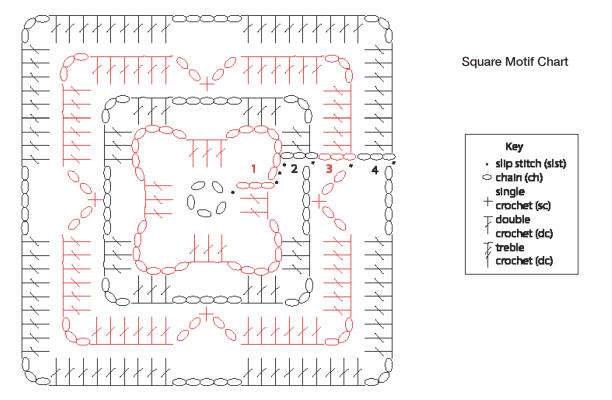
Ch5, slst to 5th ch from hook to form ring.
Round 1: Ch10 (counts as dc, ch7), *3dc in ring, ch7, rep from * two more times, 2dc in ring, slst to 3rd ch of beg ch to join. — 4 ch7 sps
Round 2: Slst into ea of in next 2 chs, ch3 (counts as dc), (2dc, ch3, 3dc) in same ch7 sp, *ch5, (3dc, ch3, 3dc) in next ch7 sp. Rep from * two more times, ch5, slst to top of beg ch3 at beg of round to join. — 4 ch3 sp corners
Round 3: Ch3 (counts as dc), 1dc in ea of next 2 dcs, (3dc, ch3, 3dc) in next ch3 sp, 1dc in ea of next 3 dcs, *ch2, sc in ch5 sp, ch2, 1dc in ea of next 3 dcs, (3dc, ch3, 3dc) in next ch3 sp, 1dc in ea of next 3 dcs. Rep from * two more times, ch2, sc in next ch5 sp, ch2, slst to top of ch3 at beg of round beg ch to join. — 4 ch3 sp corners
Round 4: Ch3 (counts as dc), 1dc in ea of next 5 dcs, (3dc, ch3, 3dc) in next ch3 sp, 1dc in ea of next 6 dcs, *ch5, 1dc in ea of next 6 dcs, (3dc, ch3, 3dc) in next ch3 sp, 1dc in ea of next 6 dcs. Rep from * two more times, ch5, slst to top of ch3 at beg of round beg ch to join. — 4 ch3 sp corners
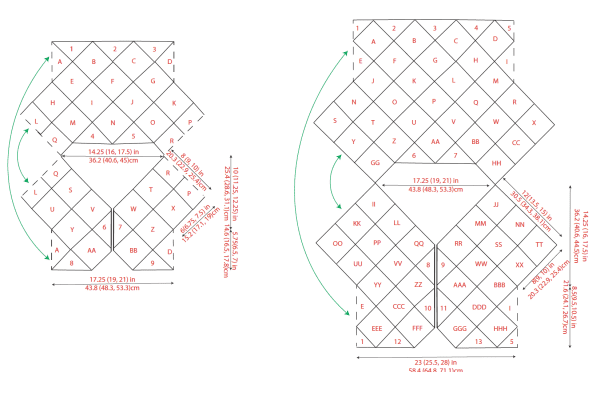
Joining remaining 27 (27, 27, 59, 59, 59) motifs
Use layouts as a guide.
Complete motif through Round 3. On Round 4, substitute a ch3 join for a ch3 at the corners and a ch5 join for a ch5 on the sides of the motif when at an adjacent motif. Join the 5th dc on each adjacent side together with a slst.
Motifs A and D (for S, M, L) and E and I (for XL, 2X, 3X) connect the front and back together at the sides. Motifs L, Q, R, and P (for S, M, L) connect the front and back together at the shoulder. Do not connect Motifs V/ W or AA/ BB (for XS, S, M) and QQ/RR or ZZ/ AAA or FFF/ GGG (for XL, 2X, 3X) at the front panel opening.
Fasten off.
Triangle Motif:
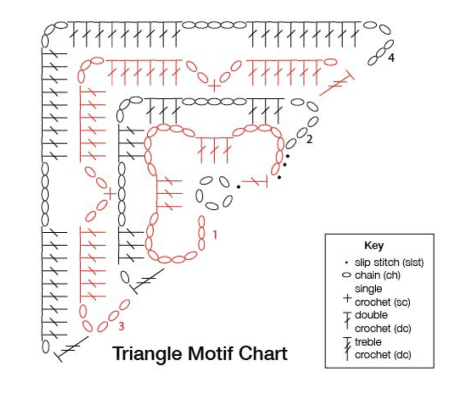
Join 9 (9, 9, 13 ,13, 13) motifs
Ch5, slst to 5th ch from hook to form ring.
Round 1: Ch10, [3dc in ring, ch7]x2, dc in ring, turn. — 3 ch7 sps
Round 2: Slst into ea of the next 3 chs, ch5 (counts as tr, ch1), 3dc in same ch7 sp, ch5, (3dc, ch3, 3dc) in next ch7 sp, ch5, (3dc, ch1, tr) in last ch7 sp, turn.
Round 3: Ch5 (counts as tr, ch1), 3dc in ch1 sp, 1dc in ea of next 3 dcs, ch2, sc in ch5 sp, ch2, 1dc in ea of next 3 dcs, (3dc, ch3, 3dc) in next ch3 sp, 1dc in ea of next 3 dcs, ch2, sc in next ch5 sp, ch2, 1dc in ea of next 3 dcs, (3dc, ch1, tr) in last ch1 sp, turn.
Round 4: Ch4 (counts as tr, ch1), slst to adjoining corner ch sp, 3dc in ch1 sp, 1dc in next 2dc, slst to 5th dc on adjoining motif, 1dc in next 4dc, ch5 join, 1dc in ea of next 5 dcs, slst to 5th dc on adjoining motif, dc in next dc, (3dc, ch3 join, 3dc) in next ch3 sp, 1dc in next 2dc, slst to 5th dc on adjoining motif, 1dc in next 4dc, ch5 join, 1dc in ea of next 5 dcs, slst to 5th dc on adjoining motif, dc in next dc, (3dc, sl st to adjoining corner ch sp, tr) in last ch1 sp.
Fasten off.
Body Edging
Join yarn to edge of project at back with slst, ch1. Evenly place (sc, ch 4, 3tr-cl) around body edge. Slst to first sc. See chart for placement. Fasten off.
Ties
Join yarn with slst to top of neck opening on front panel. Chain for 28 (30, 32, 34, 36, 38)in or 71.1 (76.2, 81.3,86.4, 91.4, 86.5) cm, turn.Slst in each ch across tobody, slst to attach. Rep onopposite side. Use natural holes in motifs to thread ties for closing in the back.
Finishing:
Weave in loose ends. Hand wash, block to finished measurements and allow to dry.
Kristin Omdahl patterns are for your personal use only and not to be used to create items for commercial gain. All Kristin Omdahl patterns are licensed for single use and remain the intellectual property of Kristin Omdahl. This pattern may not be reproduced or transmitted in any form or by any means, electronic, mechanical, photocopying, recording or otherwise.
©Copyright 2025 All Rights Reserved
About Kristin Omdahl Kristin Omdahl is a bestselling author, designer, and creative entrepreneur known for her “sensory storytelling” — weaving food, craft, and nature into unforgettable fiction and non-fiction. Her debut novel, The Sea Glass Journal, is a love letter to Florida’s Gulf Coast, exploring themes of healing, connection, and creative legacy.
When she’s not writing, Kristin shares crochet and knitting designs, recipes, and behind-the-scenes glimpses of her creative process with her global community on Patreon.