
DIY Furniture
How I Made a TV Stand with Wooden Crates DIY by Kristin Omdahl
Sep
How I Made a TV Stand with Wooden Crates DIY by Kristin Omdahl
I love to make things. I love to work with my hands. I dream of a garage full of tools and the skills to make furniture one day.
Last month, I made an outdoor coffee table from 4 wooden crates. And, I was really proud of myself. I know it wasn’t the fanciest piece of furniture, but I thoroughly enjoyed the process of making it with all my heart.
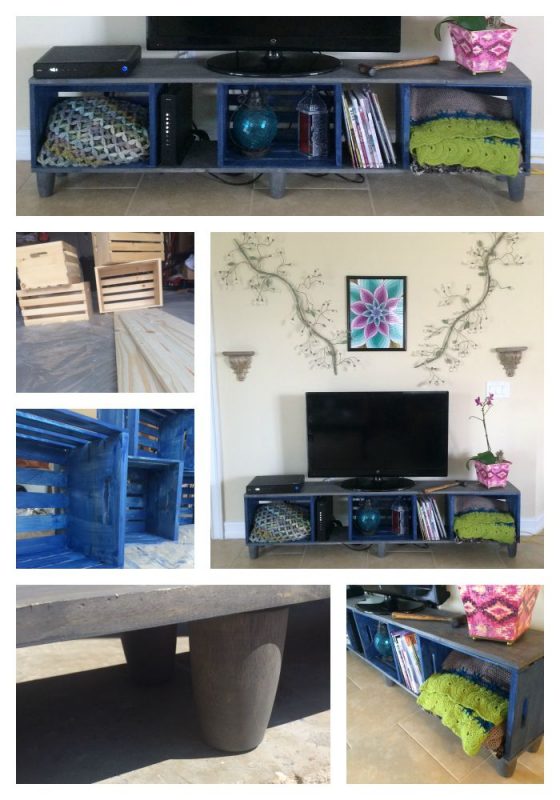
I have been wracking my brain trying to come up with a cool idea to make another piece of furniture. I need a TV stand for my living room. I thought about stacking all kinds of materials… cinder blocks, glass blocks, metal piping… and then it occurred to me that I could take what I learned from the coffee table and apply a few more tidbits of furniture building. Used as building blocks (no pun intended) on my learning scale, I set out to make a TV stand. I planned on sandwiching crates between two wooden boards and putting feet on the bottom.
I went to Home Depot (my favorite store) and found 4 crates. Studied the dimensions to make sure I understood what else I was going to need: 18″ x 12.5″ x 9.5″. I knew I wanted it longer than 3×18=54″ long, and wood planks came in either 48″ or 72″ lengths. I also knew that just because the crates had dimensions printed on the labels, didn’t mean they were precisely accurate. I measured a few and the variance was about 1/4″! What that means, is that 4 crates would not perfectly line up in the sandwich of 72″ boards. So I had to think on it a little more. I knew the boards needed to be cut to 9.5″ wide (but actually the variance was off a bit here too) so I asked the guy to cut them to 9.75″ to be safe. I figured a slight overhand on the back side would not be too noticeable. NOTE: I now have two boards 8.25″ x 72″ in my garage for future use…
As I kept running the numbers in my head for the length, I ended up deciding that I could space 3 crates between the 72″ and use the extra spaces for additional storage cubbies. So with 3 crates I would end up with 5 storage spots.
Next up was deciding on legs. The prices were all over the place! There were fat, skinny, short, tall, you name it and they ranged from $3 to $20 a piece! I wish I could tell you a great story about why I chose the ones I did, but seriously I just went with the cheapest ones.
I knew I was going to use the left over stain from the coffee table (Island Water) for the crates. I love that color. But I wanted to use a more neutral stain for the sandwiching boards and legs. I went over to the stain department and narrowed it down to two: weathered oak and classic gray. I hoped classic gray was more like the color of driftwood in my mind and went with the latter.
I gave a quick sanding to all the components with 60 grit sand paper. Learning from the first project, I decided to stain BEFORE assembly! OMG I spent at least 3 times longer staining the crates the first time around because after nailing them together I created so many more crevices that were hard to reach and stain. Left everything to dry for a bit and tried to figure out how I was going to start the holes for the legs (they came with flat 1/4″ screw tops for securing to the table.
I don’t have power tools, but I do still have my grandpa’s hammer. It makes me so happy to use his hammer when I build things in my garage. I like to think he is here with me, enjoying my stubbornness and tenacity to build without power tools. I hope he loves the fact that I love his old hammer so much, too.
I decided to “pre-drill” holes for the legs with a screwdriver slightly narrower than the screws on the legs. I lined up the screw driver on the back side of the base and gave it a good whack with the hammer. Screwed the legs into place and turned the base back over.
I placed a crate on each end of the base and carefully lined them up to the corners and nailed them down. I re-measured the middle section to make sure I centered the third crate properly. Marked it, set the final crate on the base and nailed it down.
Next, I sandwiched the top board onto the crates and carefully lined it up before nailing it down. I polyurethaned the whole piece (with satin finish) and let it dry. Ran some steel wool over everything to rough it up a bit and give it a distressed, beat up finish.
With a little help, I dragged it upstairs to the living room and WOW! I love it so much and can’t even remember the living room without it now.
I decided to leave my grandpa’s hammer out on the TV stand. I love the patina of the old wooden handle, shiny and oiled from years of use. Weird decoration? Sure. A reminder of my roots? Sure, that too. And, on a lighter note, I guess it will be handy when the mood to build something strikes again.
xoxo, Kristin
Super job!!! Looks wonderful!! Love that the hammer is laying there. 🙂
Thank you!
Good job! I like doing things like this!
Thanks, Dena! Totally #HammerTherapy for me. It soothes my soul to build things.
You did a great job! And definitely will help me make my own. My question to you is in need one for a smaller space (bedroom corner) would it be the same concept except I would build up and not out?