
Crochet, Free Crochet Pattern, Free Pattern, Free Poncho Pattern, Free Worsted Weight Yarn Pattern
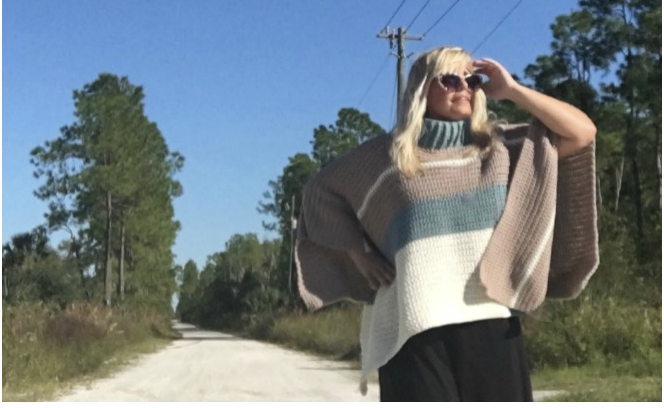
Be So Brave Crochet Poncho FREE Pattern
Oct
Be So Brave Crochet Poncho FREE Pattern
by Kristin Omdahl
Materials:
Be So Brave Yarn; 100% American Merino Wool, #4 medium worsted weight; 120 yds (109m) per 2oz (56g) hank;
(8) hanks Color A Waves of Grain
(2) hanks Color B Picket Fence
(2) hank Color C Cape Cod Bay
or
(12) hanks of one color only if you are making this in ONE COLOR
L/11 (8mm) crochet hook Yarn needle Optional (2) 3” buttons

#3 DK Weight Yarn
Gauge: 3sts/3rows = 1” in single crochet after blocking
NOTE: because of the nature of this particular gauge, in order to pick up sts evenly across end of rows (which you will be doing often in this pattern), pick up and knit into every end of rows.
Finished size: 48″ wide x 22″ long
Special Stitch Instructions:
Front Post Double Crochet (fpdc): Wrap the yarn around the hook, insert the hook from in front and from right to left around the stem of the appropriate stitch. Complete the dc stitch normally.
Back Post Double Crochet (bpdc): Wrap the yarn around the hook, insert the hook from behind and from right to left around the stem of the appropriate stitch. Complete the dc stitch normally.
Instructions:
First Rectangle:
With Color B, CH 71
Row 1: ch1, sc in ea st across. — 70 sts
Rows 2- 30 : rep row 1. Fasten off.
First Horizontal Stripe:
Row 1: with color C, join with slst in last st of last row, ch1, sc in ea st across. — 70 sts
Rows 2 – 12: ch1, sc in ea st across. — 70 sts
Do not fasten off.
First Vertical Stripe:
Row 1: ch1 turn 90 degrees and begin to work along end of rows of first horizontal stripe and first rectangle:, working 1sc in ea end of row. — 42 sts
Row 2: ch1, sc in ea st across. — 42 sts
Rows 3 – 12: rep row 2. Fasten off.

Second Horizontal Stripe:
Row 1: with color A, join with slst to last end of row from first vertical stripe, ch1, sc in ea end of row along first vertical stripe (12 sts) and ea st across first horizontal stripe (70 sts). — 82 sts
Row 2: ch1, sc in ea st across. — 82 sts
Rows 3 – 12: rep row 2. Do not fasten off.
Second Vertical Stripe:
Row 1: ch1, turn 90 degrees and begin to work along end of rows of second horizontal stripe (12 sts) and in last row’s sts of first vertical stripe (42 sts). — 54 sts
Row 2: ch1, sc in ea st across. — 54 sts
Rows 3 – 12: rep row 2. Fasten off.
Third Horizontal Stripe:
Row 1: with color B, join with slst to last end of row from second vertical stripe, ch1, sc in ea end of row along second vertical stripe (12 sts) and ea st across second horizontal stripe (82 sts). — 94 sts
Row 2: ch1, sc in ea st across. — 94 sts
Do not fasten off.
Third Vertical Stripe:
Row 1: ch1, turn 90 degrees and begin to work along end of rows of second third horizontal stripe (2 sts) and in last row’s sts of second vertical stripe (54 sts). — 56 sts
Row 2: Ch1, sc in ea st across. Fasten off.
Fourth Vertical Stripe:
Row 1: with color A, join with slst in last st worked on third vertical stripe and sc in ea st across.
Row 2: ch1, sc in ea st across. — 56 sts
Rows 3 – 20: rep row 2. Do not fasten off.
Fourth Horizontal Stripe:
Row 1: ch1, turn 90 degrees and begin to work along end of rows of fourth vertical stripe (20 sts), third vertical stripe (2 sts) and across all sts from third horizontal stripe (94 sts). — 116 sts
Row 2: ch1, sc in ea st across. — 116 sts
Rows 3 – 8: rep row 2.
Neck opening:
Next row: ch1, sc in ea of next 44 sts, FSC 28 sts, skip 28 sts, sc in ea of last 44 sts. — 116 sts
Back:
NOTE: while front was worked from bottom to top, to keep this garment seamless, we are working the back from the top to the bottom
Row 1: ch1, sc in ea st across. — 116 sts
Rows 2 – 64: rep row 1. Fasten off.
Cowl:
Round 1: with yarn B, join with slst to any st in neck opening, ch3 (counts as dc), work 1dc in ea st around, slst to top of ch3 at beg of round to join. — 56 sts
Round 2: ch3 (counts as dc, or bpdc), FPDC around next st, *BPDC around next st, FPDC around next st. Rep from * around, slst to top of ch3 at beg of round to join. — 56 sts
Rounds 3 – 10: rep round 2. Fasten off.
Weave in loose ends. Hand wash, block to finished measurements and let dry.
Optional finishing: Sew button through both thicknesses and sleeve edge, halfway between hem and neckline for a “sleeved” look.
Kristin Omdahl patterns are for your personal use only and not to be used to create items for commercial gain. All Kristin Omdahl patterns are licensed for single use and remain the intellectual property of Kristin Omdahl. This pattern may not be reproduced or transmitted in any form or by any means, electronic, mechanical, photocopying, recording or otherwise.
©Copyright 2021, All Rights Reserved
Thank you for choosing to knit and crochet Kristin Omdahl patterns!
I know that you have thousands of choices for buying yarn and body care products. I want you to know what makes MY products special, and feel good about shopping the Kristin Omdahl brand.
Kristin Omdahl products have a heart! That’s right, a portion of every sale supports the charity I established: Project Kristin Cares.
I am a survivor of domestic violence, a hugely hidden problem in our society. You, or someone you know, has been affected by it, or is still suffering now. Statistics show that 1 in 3 women, and 1 in 4 men have been victims of domestic violence during their lifetimes.
But because it is so rarely discussed, I always felt like I was alone. One of the worst parts for me was that feeling of loneliness and having a dirty secret that had to be hidden.
Through my charity, Project Kristin Cares, we can make a difference in the lives of people who have been affected by domestic violence. I want to share the message that victims are not at fault, not alone and should not be embarrassed to share their stories.
Kristin Omdahl products are beautiful, thoughtful and valuable. But even more importantly, every time you purchase a product from my company, a portion of the sale supports
Project Kristin Cares. Please help me knock out domestic violence, one sale at a time.
xoxo, Kristin
Shop Kristin Omdahl Yarns HERE
Shop Kristin Omdahl Crochet Patterns HERE
Shop Kristin Omdahl Knitting Patterns HERE
I would love to see your creations. Just as much fun as making these myself is the satisfaction I get from seeing my designs come to life and other crochet fans wearing them too. There are now 2 ways you can share what you have done!
- Share yours by joining Create. Share. Inspire on Facebook where you can interact with me as well as many other members who have a love of knitting and crochet just like you! It is a wonderful and safe place to share your photos of finished projects in my knitting or crochet patterns or yarns, and to see what others are making, too.
- I have recently added a wonderful new interactive section to the website which I invite you to take part in, it has been a smashing success and such fun so far. It is the new “Share Your Project” section. You, my creators, can upload images and descriptions of your creations to share with the ever growing community! To upload simply click here.
Additionally, I host a livestreaming podcast weekday on my YouTube Channel called Create Share Inspire Podcast. You can join the audience and even ask me questions LIVE! I often do a show and tell, or quick demo and I always interact with the live audience. It is a lot of fun!
You can browse through over 800 previously recorded episodes HERE: Create Share Inspire Podcast Playlist . Make sure to subscribe to my YouTube Channel to get reminders when the next episode airs LIVE.
I look forward to seeing what you create!
xoxo,
Kristin
thank you for sharing your story Kristin. I am also a victim of domestic violence and I escaped it over 154 yrs ago but it still haunts me today. Thank you for all you do!!
So glad you are good now! Thanks for your support! xoxo, Kristin
Im lost!!! It says in pattern for 4th vertical strip to do 20 rows, but for the 4th horizontal strip to crochet across 30 stitches. How can it be 30 stitches if you only have 20 rows?
Thank you for letting me know!
It has been revised to the following:
Fourth Horizontal Stripe:
Row 1: ch1, turn 90 degrees and begin to work along end of rows of fourth vertical stripe (20 sts), third vertical stripe (2 sts) and across all sts from third horizontal stripe (94 sts). — 116 sts
Row 2: ch1, sc in ea st across. — 116 sts
Rows 3 – 8: rep row 2.
Thank you for your help!
Im lost again. The neck doesn’t add up to 116.
Maybe the revision wasn’t updated on your computer yet? Try refreshing the page. It looks good to me.