

Recipe
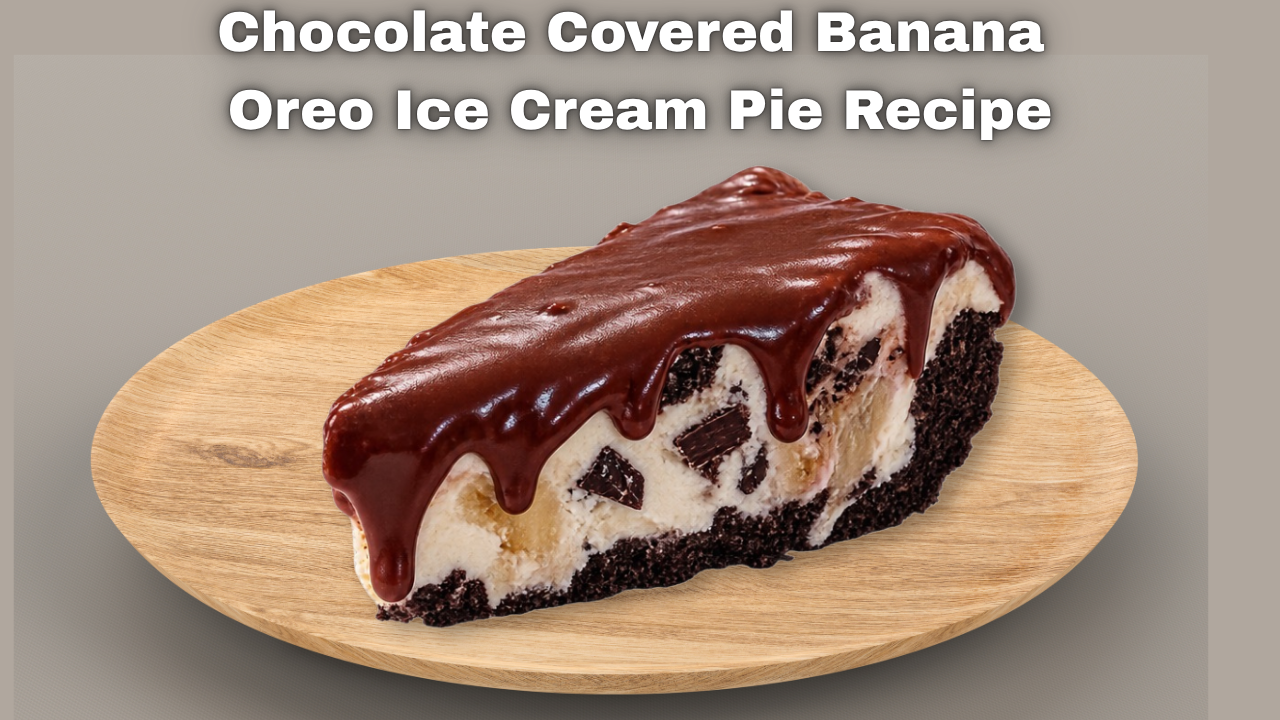
Chocolate Covered Banana Oreo Ice Cream Pie Recipe
Aug
Some recipes are brand new ideas. Others have been following you around for decades, changing a little every time you make them.
This one is definitely the latter.
I have been making ice cream pies for a very, very long time. Long before I published my original Quick & Easy Ice Cream Pie recipe and video back in 2015, I was bringing them to parties. Eventually, they became one of those desserts people actually requested that I bring.
And I understand why. Ice cream pie is ridiculously easy to customize, it can be made ahead of time, it feeds a crowd, and there are almost endless ways to make one.
Over the years, I have swirled marshmallow cream through ice cream. I’ve added hot fudge and caramel. I’ve changed the flavors, toppings and combinations depending on the occasion.
Apparently, after all these years, I’m still not finished experimenting.
From the Archives: I’ve Been Doing This a LONG Time
In December 2015, I finally shared one of my ice cream pies here on the website along with a video tutorial: How to Make Quick & Easy Ice Cream Pie.
That version used a graham cracker crust, ice cream, chocolate fudge sauce and caramel sauce. Simple, delicious and very much representative of the ice cream pies I’d already been making for years.
So when I recently found myself dreaming up another one, it felt a little like visiting an old friend.
Except this time, I had a very specific challenge.
The Inspiration: Frozen Chocolate-Covered Bananas
A friend’s birthday was coming up, and I wanted to surprise him with something special.
One of his favorite treats is a frozen chocolate-covered banana.
Challenge accepted.
Instead of simply making chocolate-covered bananas, I started thinking about how I could translate those flavors into a birthday dessert.
- Chocolate
- Banana
- Frozen
- Creamy
- Crunchy
Ice cream pie!
I chose Ben & Jerry’s Chunky Monkey ice cream for the banana-and-chocolate foundation and decided to layer in fresh banana and cover it with chocolate ganache.
And then there was the crust.
Oh, that crust.
Yes, You Can Buy an Oreo Crust
I know.
Everyone says homemade is better.
Homemade bread is better. Homemade sauce is better. The book was better than the movie. Blah, blah, blah.
But for real this time.
You absolutely can buy a premade Oreo cookie crust for this recipe. It will work. It will save time. Your pie will still taste good. But after making this homemade Oreo crust, I don’t think I would choose the premade version when I have the extra few minutes. And it isn’t simply because it’s homemade. The ratio, texture and flavor are completely different.
A homemade crust lets you create a much more substantial layer of Oreo crumbs and butter. Against the creamy frozen ice cream, soft banana and rich chocolate, that thicker cookie layer becomes an important part of every bite. The crust isn’t just there to hold the ice cream. It is one of the major flavors and textures of the dessert.
For this batch, I used 28 Oreo cookies and 5 tablespoons of butter — and, as you’ll see in a minute, that made enough for more than just the birthday pie.
So here’s my recommendation:
Buy the ice cream. Make the crust.
Chocolate Covered Banana Oreo Ice Cream Pie
Ingredients
For the Oreo crust
- 28 Oreo cookies
- 5 tablespoons (70g) butter, melted
For the filling
- 2 pints Chunky Monkey ice cream, softened enough to spread
- 3 frozen bananas, thawed, mashed and drained of excess liquid
Chocolate ganache
- 4 oz chocolate, chopped (milk chocolate, dark chocolate or semi sweet chocolate all work fine)
- 4 oz heavy cream or half & half cream
Optional for serving
- Additional sliced banana
- Crushed Oreo cookies
- Chocolate drizzle or additional ganache
How to Make the Oreo Crust
- Crush the Oreo cookies into fine crumbs. You can do this in a food processor or place the cookies in a sealed bag and crush them with a rolling pin.
- Combine the Oreo crumbs with the melted butter and mix until all of the crumbs are evenly moistened.
- Press the mixture firmly and evenly into the bottom and up the sides of your pie dish.
- Freeze the crust until firm before adding the ice cream filling.
Note: This quantity gave me enough crust for my full-size pie plus one 4-inch mini pie. If you’re only making one large pie, you can either make a wonderfully substantial crust or reserve some of the mixture for another use.
Assemble the Ice Cream Pie
Allow the ice cream to soften at room temperature just until it is spreadable. You don’t want to completely melt it.
Spread a layer of softened Chunky Monkey ice cream into the frozen Oreo crust.
Add the mashed, thawed bananas and swirl into the softened ice cream.
Smooth the top and freeze for 3 – 4 hours or overnight.
Make the Chocolate Ganache
- Heat 4 oz cream on the stove until just simmering, not boiling.
- Pour heated cream over 4oz of chopped chocolate.
- Let sit for 5 minutes.
- Then mix until well combined and the chocolate is completely melted.
- Allow to cool 10 minutes until room temperature.
- Pour over frozen pie and gently smooth to edges. Work quickly so you don’t melt the ice cream unnecessarily.
- Return the pie to the freezer and freeze at least one hour.
Note: The ganache is a 1:1 ratio, not meant to be solid like a magic shell coating. It shoudl be firm but easy enough to insert birthday candles and slice.
A Few Ways to Make It Your Own
This is really less of a rigid recipe and more of a formula I’ve been playing with for years:
crust + ice cream + swirl + toppings = your own ice cream pie
Try marshmallow cream swirled through chocolate ice cream. Add hot fudge or caramel. Change the cookie crust. Layer in fruit. Combine two different ice cream flavors.
Once you understand the basic construction, there really isn’t much you can’t do with it.
And because the entire dessert lives in the freezer, it’s also a wonderful make-ahead dessert for birthdays and parties.
And Then the Math Nerd Got Involved…
There was one more complication.
I was making this pie for a friend’s birthday, which meant I was making a special dessert for someone who wasn’t my son.
Apparently, becoming an empty nester does not switch off the part of my brain that immediately thinks:
But what am I making for Marlon?
So naturally, I made him one, too.
Not another giant pie. I pulled out a little 4-inch pan and used some of my Oreo mixture to make a miniature version.
Which immediately sent me down another rabbit hole.
If 28 Oreos and 5 tablespoons of butter gave me enough crust for the large birthday pie and a 4-inch pie…
How many 4-inch ice cream pies could I make from one full recipe?
Because now we’re not just talking about an adorable way to assuage my empty-nester void. 😂
Mini ice cream pies could be fantastic for individual desserts, dinner parties, birthday gifts, hostess gifts or keeping several different flavors in the freezer.
And this is precisely how a simple dessert turns into a Math Nerd experiment around here.
Math Nerd: How Many Mini Pies Will This Make?
We start with cylinder volume:
V = πr²h
Volume = radius squared × pi × height.
My original pie was approximately 9 inches in diameter and 3 inches deep.
- Radius = 4.5 inches
- 4.5² × π × 3
- ≈ 190.9 cubic inches
I also had enough ingredients left over to make one 4-inch mini pie approximately 2 inches deep:
- Radius = 2 inches
- 2² × π × 2
- ≈ 25.1 cubic inches
Together, that’s approximately:
190.9 + 25.1 = 216 cubic inches of ice cream pie
Now let’s work backward to make the recipe divide nicely into mini pies.
What if we make 8 mini pies?
216 ÷ 8 = 27 cubic inches per mini pie
For a 4-inch round tart, the base area is:
2² × π = 12.57 square inches
So:
27 ÷ 12.57 = 2.15 inches deep
🎯 That’s extremely reasonable.
In other words, instead of saying your original mini was exactly 2 inches deep—which can be adjusted by how high you pile your filling—we can say that the same recipe should make:
Approximately eight 4-inch mini ice cream pies, filled about 2 to 2¼ inches deep.
Is any of this necessary to make an ice cream pie? Absolutely not. 😂 But now we know that instead of making one 9-inch pie plus one little pie for your adult child because you miss him, you can make eight adorable 4-inch pies and share the love a little more evenly.
The Birthday Verdict
The finished pie turned out even better than I hoped. The combination of banana, chocolate, creamy ice cream and that thick Oreo crust captured everything I wanted from the frozen-chocolate-covered-banana inspiration. But the biggest surprise for me was the crust.
After all these years of making ice cream pies — and after publishing my first version online more than a decade ago — I still found a way to make one that taught me something new. And that’s probably why I’m still doing this.
Recipes don’t always need to be reinvented. Sometimes they just need another party, another person you love, another idea… and maybe 28 Oreos.
And for me, any excuse to put on my Math Nerd hat is a good day.
Let us make time to create, share and inspire today and every day.
xoxo, Kristin
Browse more of my recipes HERE
About Kristin Omdahl

Kristin Omdahl is an author, designer, and lifelong maker with more than 20 years of experience creating crochet and knit patterns, books, tutorials, recipes, and creative projects. With more than 1,000 designs published worldwide, her work blends creativity, technique, curiosity, and a love of storytelling.
She is the host of The Kristin Omdahl Show, where she shares the creative process behind what she’s making, explores ideas and rabbit holes, revisits more than two decades of creative work, and finds inspiration in everything from yarn and color to recipes, math, travel, and everyday life.
Kristin is also the author of The Sea Glass Journal, a novel about creativity, self-discovery, and beginning again, set against the beauty of coastal living. Its world continues to inspire many of the recipes, patterns, projects, and stories she shares.
Explore The Kristin Omdahl Show, more than 1,000 knit and crochet patterns, tutorials, recipes, books, and more at KristinOmdahl.com.
