
Free Bag Pattern, Free Pattern, Free Sewing Pattern, Kristin Omdahl Fabric
How to Sew Fully Lined, Flat Bottomed, Drawstring Bag FREE Pattern
Jan
How to Sew Fully Lined, Flat Bottomed, Drawstring Bag FREE Pattern
by Kristin Omdahl
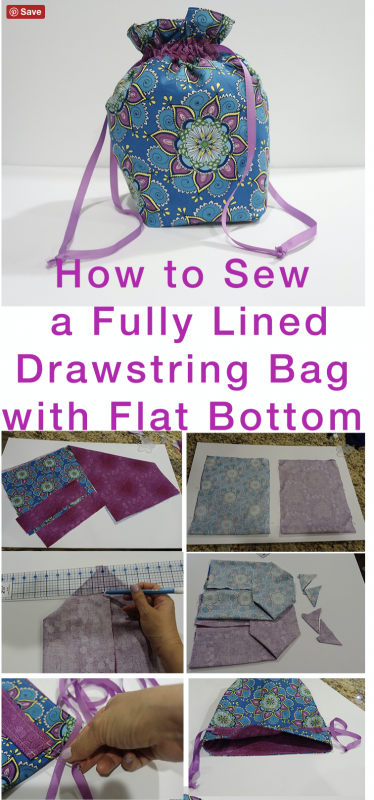
Lining a bag really is a big step toward a professional-looking finished project. Here you will learn step by step how to sew a lined drawstring bag. For an added pop of color, I chose 2 prints from my Day of the Dragonfly collection. And the interior lining print is fortified by using it for the drawstring casings on the front of the bag, as well. In this tutorial, I will show you how to:
* create a flat bottom, which allows the bag to sit up on its own (GREAT as a knit or crochet project bag)
* line the bag (lining and bag both have flat bottoms)
* sew a casing for the drawstring on the outside of the bag
The Day of the Dragonfly fabric collection is hand drawn artwork by Kristin Omdahl. You can order any of these coordinating prints in Kristin’s Spoonflower Shop. Click on photo to be directed to the fabric shop.
You can find this lined drawstring bag sewing pattern and 80 more handmade gift ideas in my gift resource book, “80 Handmade Gifts”. Learn more bout this amazing gifting resource here: 80 Handmade Gifts Book by Kristin Omdahl
Browse more of my free sewing patterns here.
What you will need to make the Fully Lined, Flat Bottomed, Drawstring Bag:
- (2) pieces of fabric cut 12″ x 30″, preferably two prints (one for bag and one for lining)
- (2) pieces of fabric cut 9.5″ x 3″ (preferably in the lining print or a third print)
- All fabrics used in this bag and tutorial are from Day of the Dragonfly Quilting Fabric Collection by Kristin Omdahl
- (2) pieces of 1/2″ grosgrain ribbon cut 30″ long
- Fabric marker
- Safety pin
- Sewing machine and standard sewing supplies
Step by Step Instructions to make the Fully Lined Drawstring Bag:
- Cut fabrics to dimensions and press smoothly with iron
- Fold the two smaller pieces of fabric in half lengthwise and press. Open up, then fold each edge toward the center crease and press again. The width should be 1.5″ now.
- Fold the side edges 1/2″ and press. Sew this edge to secure.
- Pin the drawstring casings to the exterior bag fabric, 3″ down from the edge. Working parallel to the short sides of the fabric. Sew along both long lengths of the drawstring casing, 1/4″ from edge. NOTE: Do not sew over the short edges of the casing again. These must remain open for the drawstring.
- Fold both of the large pieces of fabric in half widthwise. Pin sides and sew 1/2″ seam allowance from fold to edge.
- Press the side seams open so they come to a point and the seam runs down the center of the point.
- With a fabric marker, mark a line perpendicular to the seam 2.5″ from point. This will be the gusset that makes the bottom of the bag flat.
- Sew along line. Make sure to back stitch at beginning and end. NOTE: make sure the gussets are pressed and sewn identically otherwise your bag may not lay perfectly flat.
- Cut points off, leaving 1/2″ of fabric before seam. Do not cut seam!
- Turn exterior bag right side facing out. Insert it into the lining bag (with right side facing in). The right sides of the fabric should be facing in and touching. And the wrong sides of the fabric should be facing out. Pin together, making sure to line up the seams.
- Sew 1/2″ seam allowance around, leaving 3-4″ unsewn.
- Pull the bags through the hole, right sides facing out.
- Insert the lining bag into the exterior bag. Press seams. Press the opening hem to match the rest of the sewn hem.
- Sew 1/4″ seam allowance around the top of the bag, making sure to catch the unsewn opening.
- Thread the ribbons through the drawstring casing as follows: Attach a safety pin to one end of one ribbon. Thread it through the drawstring casing on one side of the bag and then through the other side of the bag’s casing. Both ends of the ribbon will be on the same side. Remove the safety pin and tie these ends in a knot. Attach a safety pin to one end of the second piece of ribbon. Thread it through the drawstring casings same as the first ribbon EXCEPT begin and end on the opposite side of the bag. Tie these ends into a knot.
- Trim any excess ribbon ends.
The bag will cinch tightly when you pull on the knots on both sides of the bag at the same time. And it will stand up!
 Kristin Omdahl is the best-selling author of dozens of knit and crochet books; designer of almost 1000 knit and crochet patterns; and producer of award-winning videos. You can join Kristin LIVE 5 days a week for The Kristin Omdahl Show on YouTube and browse through thousands of tutorial videos there, too. Kristin donates a portion of every sale to help survivors of domestic violence. Learn more about Kristin’s charity, Project Kristin Cares HERE.
Shop all of Kristin Omdahl’s knitting and crochet patterns, books and courses here:
- Shop Kristin Omdahl Crochet Patterns
- Shop Kristin Omdahl Knitting Patterns
- Shop Kristin Omdahl Books
- Shop Kristin Omdahl Courses
I would love to see your creations. Just as much fun as making these myself is the satisfaction I get from seeing my designs come to life and other knit and crochet fans wearing them too. There are now 2 ways you can share what you have done!
- I have recently added a wonderful new interactive section to the website which I invite you to take part in, it has been a smashing success and such fun so far. It is the new “Share Your Project” section. You, my creators, can upload images and descriptions of your creations to share with the ever growing community! To upload simply click here.
- If you want to continue the party, join the KO Community Forums on my website. It is 100% PRIVATE! You can start or join forum posts, and even direct message others, too. Join the KO Community forums HERE
Additionally, I host a livestreaming podcast, vlog or show weekday on my YouTube Channel called The Kristin Omdahl Show. You can join the audience and even ask me questions LIVE! I often do a show and tell, or quick demo and I always interact with the live audience. It is a lot of fun!
You can browse through over 1000 previously recorded episodes HERE: The Kristin Omdahl Show Playlist. Make sure to subscribe to my YouTube Channel to get reminders when the next episode airs LIVE.
You can also Refer-A-Friend and get rewarded, too! Learn more HERE
I look forward to seeing what you create!
xoxo,
Kristin
Is there a pdf for this? Any way we can get one?
there should be a greet print-friendly button at the bottom of the free pattern page.
Warm regards,
Kristin
Hello! Love the bag, thanks so much for the pattern. Quick question: what are the dimensions of the stand up base? Thanks so much!
Perfect results with my bag, the instructions and dimensions were spot on! For those that didn’t or couldn’t read the dimensions, may I suggest a visit to the opticians ……
Adjusted this down to make a dice bag; it was perfect!
I love this pattern! Thanks for sharing.
Pingback: I Love My Reusable Fabric Gift Bags… That I Made Years Ago! – Simply Kyra
Wonderful! Thanks for sharing. xoxo, Kristin
Pingback: Crafting for Calm and Consistency | Kristin Omdahl