
Free Crochet Pattern, Free DK weight yarn pattern, Free Hat Pattern, Free Pattern
Julian Honeycomb Hat | Free Crochet Pattern
Oct
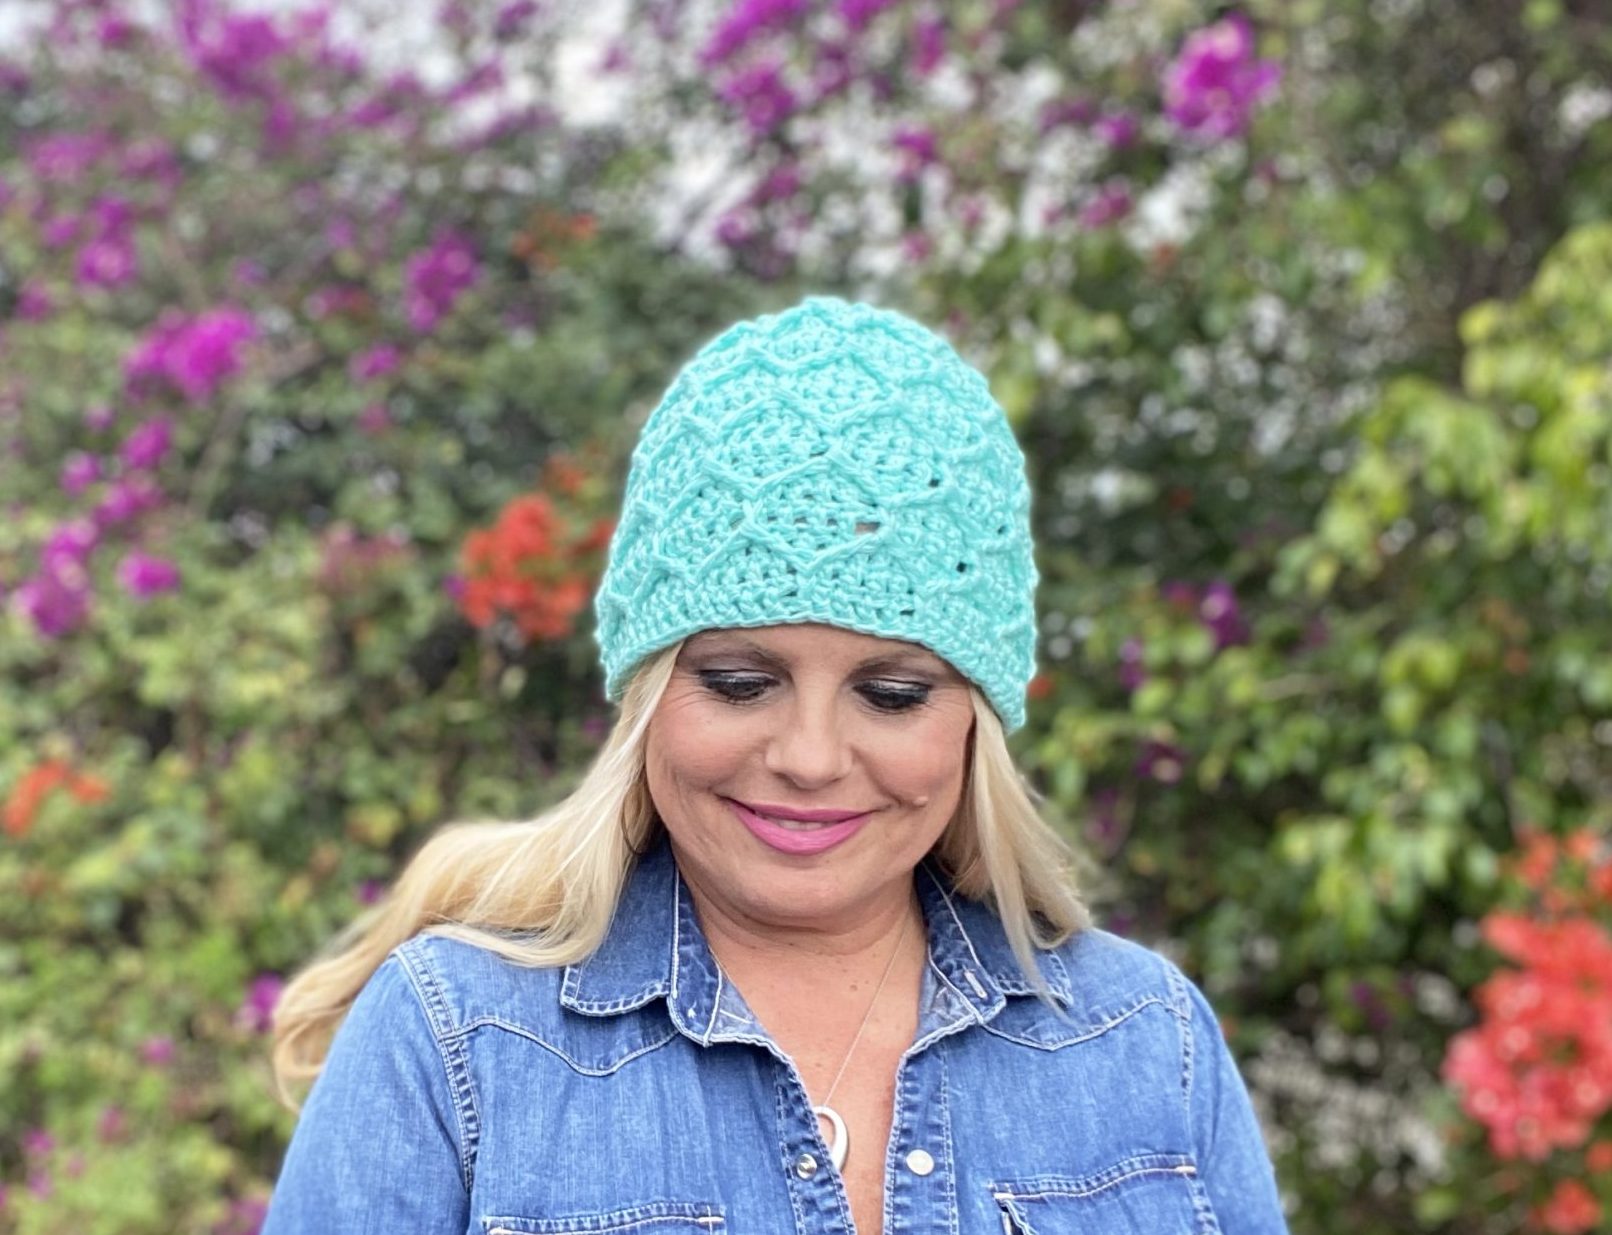
Meet the Julian Honeycomb Hat — a modern crochet design that balances warmth, structure, and style. The bold honeycomb texture is created with post-stitch technique, giving the hat a knit-like depth while staying quick and satisfying to make.
Worked from the bottom up, this pattern is easy to memorize and fun to customize in any color or yarn weight. The rhythmic stitches form a geometric pattern reminiscent of woven baskets and cozy fall knits — perfect for gift-giving or your own handmade wardrobe.
Pair it with a neutral tone for everyday wear, or choose a bright pop of color to make the texture shine. Whether you’re new to textured crochet or a post-stitch pro, the Julian Hat delivers a polished finish every time.
Includes chart, step-by-step video tutorial, and ad-free PDF option.
Instantly download the ad-Free PDF Pattern HERE
What you will need:
- 234 (258, 284) yds or 214 (235.9, 269.6)m #3 dk weight yarn
- G/7 (4.5mm) crochet hook, or size needed to obtain gauge.
- Yarn needle
- Scissors
Note: Pattern uses #3 DK weight yarn held double. You may substitute a single strand of #5 bulky weight yarn to achieve similar gauge and texture.
Finished Sizes:
16 (20, 24) in or 40.6 (50.8, 61) cm circumference;
7.5 (8.5, 9.5) in or 19 (21.6, 24.1)cm tall.
Shown in size 24 in (61cm) circumference.
Gauge:
12 sts and 10 rounds = 4 in/10cm in pattern.
Stitch Guide:
See glossary for chain (ch), double crochet (dc), single crochet (sc), front post double crochet (fpdc), back post single crochet (bpsc), front post treble crochet 2 together (fptr2tog), and slip stitch (slst).
Instructions:
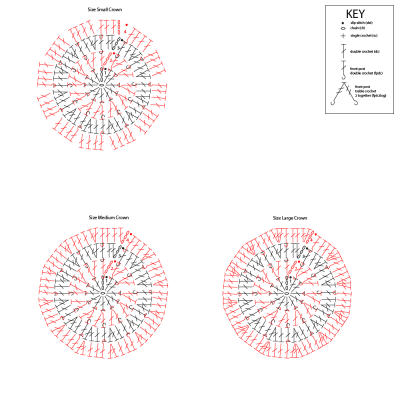
Round 1: Ch4, 11 dc in 4th ch from hook, slst to top of beg ch3 to join. — 12 dc
Round 2: Ch3 (counts as dc, FPDC around the post of first st, *dc in next st, FPDC around the post of same st; rep from * around, slst in top of beg ch3 to join. — 24 sts
Round 3: Ch3, 2 dc in same st, FPDC around the post of next FPDC, *3 dc in next st, FPDC around the post next FPDC; rep from * around, slst in top of beg ch3 to join—48 sts
Round 4: Ch3, 0 (1, 2) dc in same st, dc in ea of next 2 sts, FPDC in next FPDC, *1 (2, 3) dc in next st, 1 dc in ea of next 2 sts, FPDC in next FPDC; rep from * around, slst in top of beg ch3 to join. — 48 (60, 72) sts
Round 5: Ch3, dc in each of next 2 (3, 4) sts, FPDC in next FPDC, *dc in each of next 3 (4, 5) sts, FPDC in next FPDC. Rep from * around, slst in top of beg ch3 to join. — 48 (60, 72) sts
Round 6: Ch3, dc in each st around, slst in top of beg ch3 to join. — 48 (60, 72) sts
Round 7: Ch3, dc in each of next 0 (0, 1) sts, *FPTR2tog in the previous and next FPDC’s 2 rows below (to form an upside-down V)**, sk st behind post st just made, dc in each of next 3 (4, 5) sts; rep from * around, ending last rep at **, dc in last 2 (3, 3) sts, slst in top of beg ch3 to join. — 48 (60, 72) sts
Round 8: Ch3, 0 (0, 1) dc in next st, *FPDC in the next post st**, dc in each of next 3 (4, 5) sts; rep from * around, ending last rep at **, dc in last 2 (3, 3) sts, slst in top of beg ch3 to join. — 48 (60, 72) sts
Round 9: Ch3, dc in each st around, slst in top of beg ch3 to join. — 48 (60, 72) sts
Round 10: Ch3, dc in next 2 (2, 4) sts, *FPTR2tog in the previous and next FPDC’s 2 rows below**, sk st behind st just made, dc in each of next 3 (4, 5) sts; rep from * around, ending last rep at **, 1dc in last 0 (1, 0) st, slst in top of beg ch3 to join. — 48 (60, 72) sts
Round 11: Ch3, dc in next 2 (2, 4) sts, *FPDC in the next post st**, dc in each of next 3 (4, 5) sts; rep from * around, ending last rep at **, 1dc in last 0 (1, 0) st, slst in top of beg ch3 to join. — 48 (60, 72) sts
Round 12: Ch3, dc in each st around, slst in top of beg ch3 to join. — 48 (60, 72) sts
Continue in established pattern (repeating rounds 7 – 12) until hat is 7.5 (8.5, 9.5) in or 19.1 (21.6, 24.1)cm from beginning.
Last Round: Ch1, BPSC in each st around, slst in first BPSC to join. Fasten off.
Finishing:
Weave in loose ends. Hand wash, block to finished measurements and allow to dry.
You Might Also Like
Love this pattern?
Get all 24 hat designs (plus printable charts) in my 24 Crochet Hats eBook — available now in the KO Shop.
Or subscribe to my newsletter for weekly free patterns, video tutorials, and creative inspiration.
Kristin Omdahl patterns, books, handouts and videos are for your personal use only; additional, up to 10 items can be made to sell from one design. Commercially produced products made from my instructions are prohibited. All Kristin Omdahl patterns, books, handouts and videos are licensed for single use and remain the intellectual property of Kristin Omdahl. This pattern may not be reproduced or transmitted in any form or by any means, electronic, mechanical, photocopying, recording or otherwise.
©Copyright 2025 All Rights Reserved
About Kristin Omdahl Kristin Omdahl is a bestselling author, designer, and creative entrepreneur known for her “sensory storytelling” — weaving food, craft, and nature into unforgettable fiction and non-fiction. Her debut novel, The Sea Glass Journal, is a love letter to Florida’s Gulf Coast, exploring themes of healing, connection, and creative legacy.
When she’s not writing, Kristin shares crochet and knitting designs, recipes, and behind-the-scenes glimpses of her creative process with her global community on Patreon.
Discover More by Yarn Weight
Explore all pattern categories by yarn weight: