
Free Crochet on Fabric Pattern, Free Crochet Pattern, Free DK weight yarn pattern, Free Pattern
Sawgrass Scallop Edging Free Crochet Edging on Fabric Pattern

Jun
What started as an online bargain became an unexpected upcycling project.
I loved the color, fabric, and fit of this dress, but when it arrived, it was shorter than I felt comfortable wearing. Instead of returning it, I used crochet to add length, movement, and a custom handmade touch.
The result is the Sawgrass Scallop Edging, a versatile lace border that can be used to upcycle and personalize ready-to-wear clothing, thrifted finds, handmade garments, accessories, and home décor projects. Whether you’re extending a hemline, embellishing a favorite piece, or transforming something ordinary into something uniquely yours, this edging offers endless creative possibilities.
What started as a simple solution to a fashion dilemma became a beautiful reminder that creativity can often solve problems that shopping cannot.
The free pattern includes written instructions, crochet charts, and a complete video tutorial so you can customize garments and accessories with your own handmade touch.
Sometimes all a good project needs is a little crochet.
What you need:
- 100 yds (91m) #3 dk weight yarn
- D/3 (3.25mm) crochet hook
- yarn needle
- scissors
Gauge & Finished Size
Gauge is provided as a reference for creating a fabric with a similar drape and appearance to the sample shown. However, exact gauge and finished measurements are less critical for this project than they would be for a fitted garment.
Because the edging is designed to be customized to fit an existing garment, your finished dimensions may vary depending on your yarn choice, hook size, tension, blocking method, and the measurements of the item you are embellishing.
Rather than focusing on matching my exact finished size, I recommend using your blocked measurements to determine the final dimensions needed for your project.
Yarn Suggestions:
Shop my favorite yarns on Amazon here
Instructions:
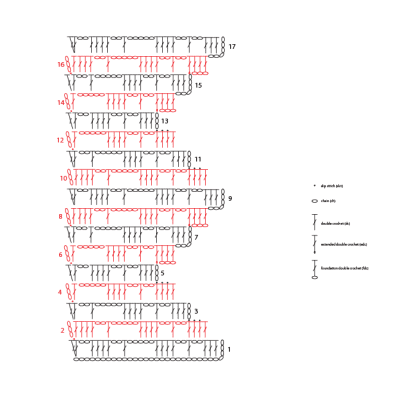
Row 1: Ch31, dc in 5th ch from hook, 1dc in ea of next 2 chs, *ch2, skip 2 chs, 1dc in next ch, ch2, skip 2 chs, 1dc in ea of next 4 chs, ch5, skip 5 chs, 1dc in next ch, ch2, skip 2 chs, 1dc in ea of next 4 chs, ch2 skip 2 chs, 2dc in last ch, turn.
Row 2: Slst into sp between first and 2nd dcs, ch3 (counts as dc), 1dc in same sp, 2dc in next ch2 sp, 1dc in next dc, ch2, skip 2 dcs, 1dc in next dc, ch5, skip next (ch2, dc), 3dc in next ch5 sp, 1dc in next dc, ch2, skip 2 dcs, 1dc in next dc, ch2, skip ch2 sp, 1dc in next dc, 2dc in next ch2 sp, 1dc in next dc, turn, skipping last 3 dcs.
Row 3: Slst across next 3 dcs, ch3 (counts as dc), 2dc in next ch2 sp, 1dc in next dc, ch2, skip next ch2 sp, 1dc in next dc, ch2, skip 2 dcs, 1dc in next dc, 3dc in next ch5 sp, ch5, skip next (dc, ch2), 1dc in next dc, ch2, skip next 3 dcs, 2dc in sp before last dc, turn.
Row 4: Slst into sp between first and 2nd dcs, ch5 (skip next ch2, dc), 3dc in next ch5 sp, 1dc in next dc, ch2, skip 2 dcs, 1dc in next dc, ch2, skip next ch2 sp, 1dc in next dc, 2dc in next ch2 sp, 1dc in next dc, turn, skipping last 3 dcs.
Row 5: Slst across next 3 dcs, ch3 (counts as dc), 2dc in next ch2 sp, 1dc in next dc, ch2, skip next ch2 sp, 1dc in next dc, ch2, skip next 2 dcs, 1dc in next dc, 3dc in next ch5 sp and dc, ch2, 2dc in sp before last dc, turn.
Row 6: Slst into sp between first and 2nd dcs, ch5 (skip next ch2 sp and 3 dcs), 1dc in next dc, 2dc in next ch2 sp, 1dc in next dc, ch2, skip next ch2 sp, 1dc in next dc, ch2, skip 2 dcs, edc in last dc, 3 FDC, turn.
Row 7: Ch6, 1dc in 5th ch from hook (skipped ch4 counts as first dc), 1dc in ea of next 2 chs, 1dc in next dc, *ch2, skip 2 dcs, 1dc in next dc, ch2, skip ch2 sp, 1dc in next dc, 2dc in next ch2 sp, 1dc in next dc, ch5 (skip next 3dcs), dc in next ch5 sp, ch2, skip next dc, 2dc in sp before last dc, turn.
Row 8: Slst into sp between first and 2nd dcs, 2dc in next ch2 sp, 1dc in next dc, ch2, 1dc in next ch5 sp, ch5, skip next 3 dcs, 1dc in next dc, 2dc in next ch2 sp, 1dc in next dc, ch2, skip ch2 sp, 1dc in next dc, ch2, edc in last dc, 3FDC, turn.
Row 9: Ch6, 1dc in 5th ch from hook (skipped ch4 counts as first dc), 1dc in ea of next 2 chs, 1dc in next dc, ch2, skip 2 dcs, 1dc in next dc, ch2, skip ch2 sp, 1dc in next dc, 2dc in next ch2 sp, 1dc in next dc, ch5, skip 3 dcs, 1dc in next ch5 sp, ch2, 1dc in next dc, 2dc in next ch2 sp, 1dc in next dc, ch2, skip next 3 dcs, 2dc in sp before last dc, turn.
Rep rows 2 – 9 until desired length is reached. For a perfect seam if joining in the round, end last repeat on a row 8 because row 9 is actually a repeat of row 1.
Attaching the Edging to Fabric
There are many ways to attach the Sawgrass Scallop Edging to fabric. Choose the method that best suits your project and skill level.
Hand Sewing
My preferred method is hand sewing the completed edging to the fabric using a needle and matching sewing thread. This method is nearly invisible from the right side of the fabric and provides excellent control over placement and fit.
Machine Sewing
If you are comfortable with a sewing machine, you may pin the edging in place and stitch it directly to the fabric. A straight stitch or narrow zigzag stitch can work well depending on the project and desired finish.
Crocheting Directly onto Fabric
For a fully crocheted finish, you can work stitches directly into the fabric using a sharp crochet hook or by first creating evenly spaced holes along the fabric edge. This method is ideal when you want the crochet and fabric to appear seamlessly integrated.
Fabric Glue
Fabric glue can be a quick and easy option for decorative projects that will receive light use. Always follow the manufacturer’s instructions and test on a scrap first to ensure compatibility with your fabric and yarn.
Decorative Stitching
Consider using embroidery floss, pearl cotton, ribbon, beads, or other embellishments as part of the attachment process. Visible stitching can become a decorative design element that adds even more personality to your finished project.
Whichever method you choose, take time to distribute the edging evenly before attaching it permanently. Blocking the edging before joining may help achieve the smoothest and most professional-looking result.
Measuring for a Perfect Fit
Before attaching your edging to fabric, it is important to block the completed crochet first. Blocking allows the stitches to relax and settle into their final shape, providing the most accurate measurements for your project.
Step 1: Complete and Block the Edging
Finish crocheting the edging and block it according to the fiber content of your yarn. Allow it to dry completely before taking measurements.
Step 2: Measure the Fabric
Measure the area where the edging will be attached.
For a dress or skirt hem, measure the full circumference of the hemline.
For sleeves, necklines, bags, curtains, table linens, or other projects, measure the exact edge where the crochet will be joined.
Step 3: Measure the Blocked Edging
Lay the blocked edging flat without stretching.
Measure the total length of the edging along the joining edge, not along the decorative points or scallops.
This measurement represents the actual finished size of your crochet.
Step 4: Compare Measurements
Ideally, the blocked edging should closely match the measurement of the fabric edge.
A small difference can often be eased in during attachment, but significant differences may require adding or removing pattern repeats before joining.
Step 5: Adjust if Necessary
If your edging is too short, add additional pattern repeats.
If your edging is too long, remove repeats or work a slightly smaller hook size and re-block.
Because the pattern is worked in repeating sections, adjusting the finished length is simple and allows you to create a custom fit for virtually any project.
Helpful Tip
When in doubt, make the edging first and let the fabric determine the finished size—not the other way around.
This project is intended to be customized, so use your blocked measurements as the final authority when determining the length needed for your garment or accessory.
About Kristin Omdahl
 Kristin Omdahl is an author, designer, and lifelong maker with over 20 years of experience creating crochet and knit patterns, books, and tutorials. With more than 1,000 designs published worldwide, her work blends creativity, technique, and a love of storytelling.
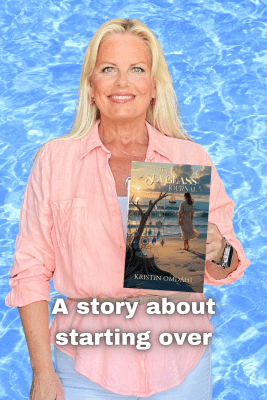
She is also the author of The Sea Glass Journal, a novel that weaves together themes of creativity, self-discovery, and coastal living—often inspiring the patterns, recipes, and projects she shares.
Explore more patterns, tutorials, and the world of The Sea Glass Journal at KristinOmdahl.com.