

Free Crochet Pattern, Free Home Dec Pattern, Free Pattern, Free Worsted Weight Yarn Pattern, Motif
Sea Glass Sanctuary Wall Art | Free Crochet Pattern
Aug
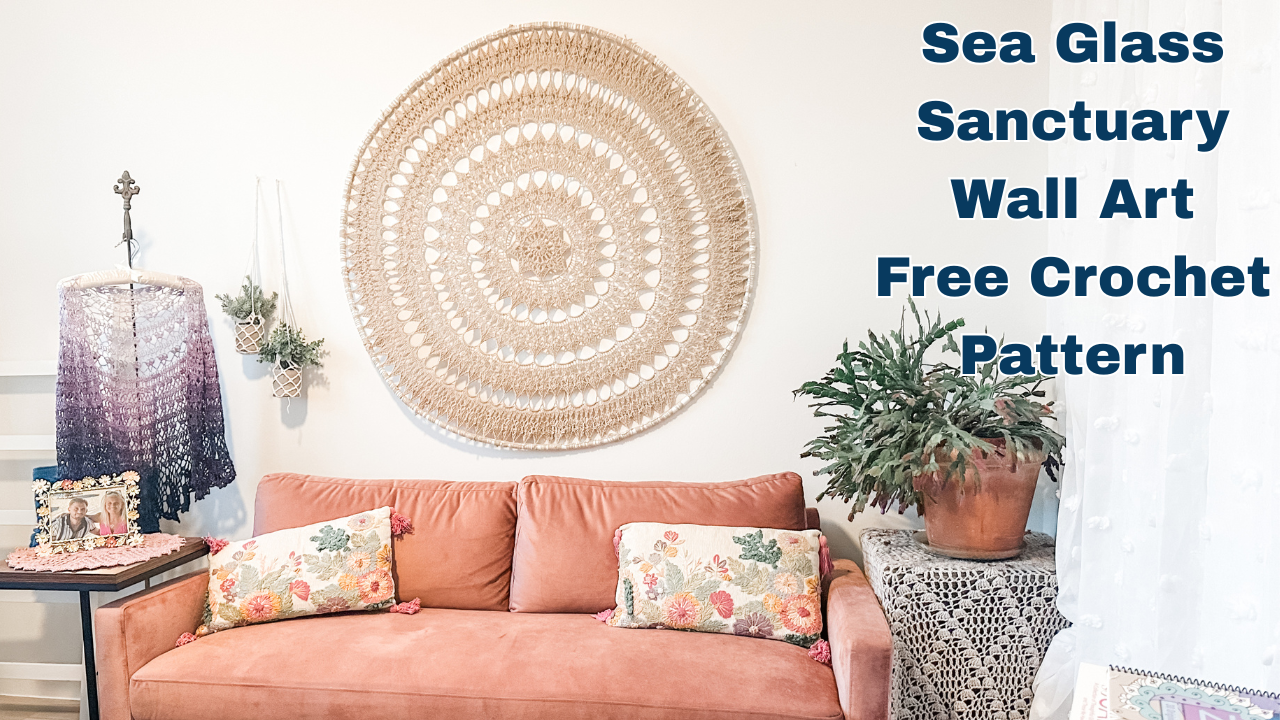
Sea Glass Sanctuary Crochet Wall Art Crochet Pattern
Transform crochet into statement-making fiber art with the Sea Glass Sanctuary Crochet Wall Art Pattern, a large circular lace design created to bring texture, beauty, and a sense of calm to your space.
Worked outward in the round, this oversized crochet motif becomes more than a traditional doily or mandala when it is stretched and mounted inside a large hoop. The open lace, repeating geometry, and radiating stitches create dramatic shadows and dimension while allowing the wall behind it to become part of the design.
I created Sea Glass Sanctuary for my own studio, where I wanted something handmade and substantial enough to anchor the space while still feeling light, coastal, and peaceful. I love the idea that the things we make can do more than decorate our homes—they can help turn an ordinary corner into a place that feels distinctly ours.
Although mine became large-scale wall art, the crochet motif itself offers plenty of room for interpretation. Change the yarn weight, hook size, color, or finished presentation to make the design your own. It could easily be a mandala, a circular lace shawl, a blanket or throw, a bag, the crown of a hat, a tablecloth or even a rug.
Below you’ll find the complete free crochet pattern for Sea Glass Sanctuary, along with the materials, measurements, and instructions you’ll need to create your own piece of crochet wall art.
Instantly download the ad-free PDF Pattern HERE
What you will need:
- 1000 yds (914m) #4 worsted weight yarn
- H/8 (5mm) crochet hook
- Yarn needle
- Scissors
- PEX 1/2 in piping
- PEX 1/2 in coupling
Shown in:
Lion Brand Pound of Love, color Sugar Cookie, 1 ball.
Finished size: 48 in (121.9cm) diameter, after blocked and dried.
Gauge: Gauge is not critical for this project but blocked, dried finished measurements are critically important for this project.
Stitch Guide:
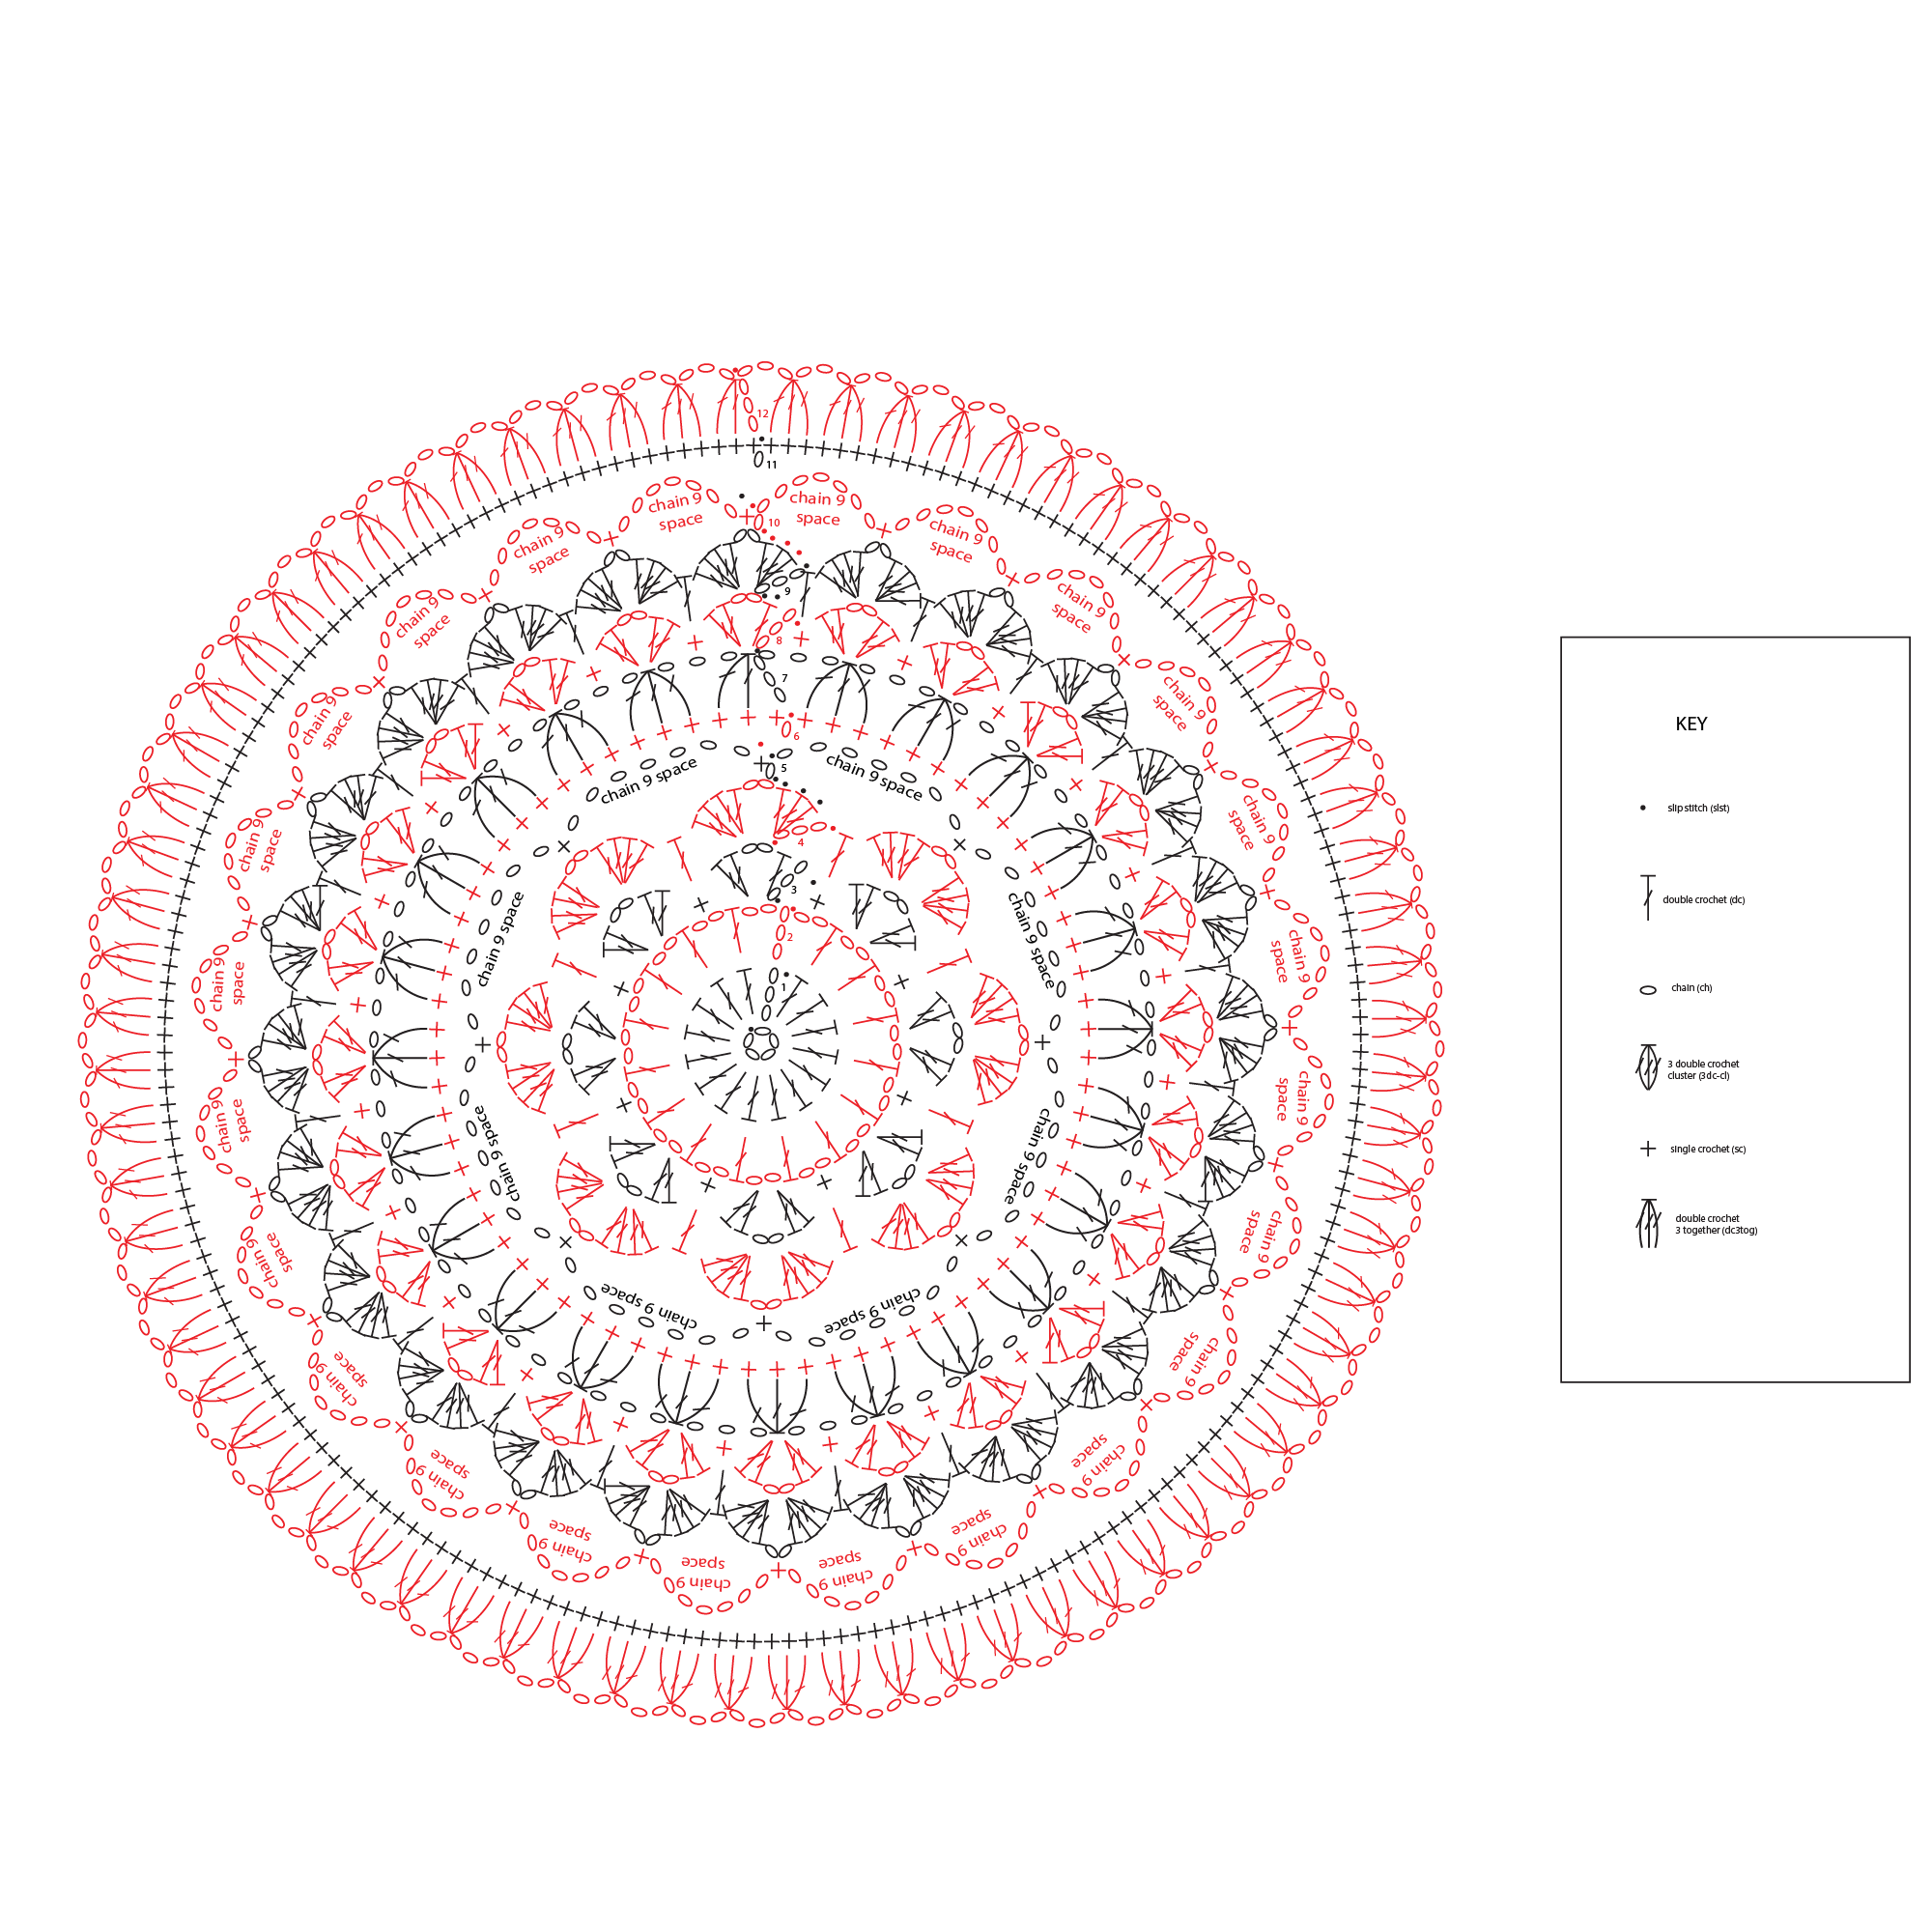
Sc (single crochet), dc (double crochet), chain (ch), and slip stitch (slst).
Beg 3dc-cluster: Ch3, (yarn over hook, insert hook into next st, yarn over and pull up a loop, yarn over and pull through 2 loops on hook)x2, yarn over and pull through all 3 loops on hook.
3dc-cluster: (Yarn over hook, insert hook into next st, yarn over and pull up a loop, yarn over and pull through 2 loops on hook)x3, yarn over and pul through all 4 loops on hook.
Note: Increases are made on rows 3 and 18 only.
Instructions:
Ch5, slst to 5th ch from hook to form ring.
Round 1: Ch3 (counts as dc), 15dc in ring, slst to top of ch3 at beg of round to join. — 16 dcs
Round 2: Ch5 (counts as dc, ch2), *dc in next dc, ch2. Rep from * around, slst to 3rd ch of beg ch5 to join. — 16 dcs, 16 ch2 sps
Round 3: Slst into first ch2 sp, ch3 (counts as dc), (1dc, ch2, 2dc) in same sp, sc in next ch2 sp, (2dc, ch2, 2dc) in next ch2 sp, sc in next ch2 sp. Rep from * around, slst to top of ch3 at beg of round to join. — 8 ch2 sps
Round 4: Slst across and in to first ch2 sp, ch3 (counts as dc), (3dc, ch2, 4dc) in same sp, dc in next sc, *(4dc, ch2, 4dc) in next ch2 sp, dc in next sc. Rep from * around, slst to top of ch3 at beg of round to join. — 8 ch2 sps
Round 5: Slst across and in to first ch2 sp, ch1, sc in same st, *ch9, sc in next ch2 sp. Rep from * around, ch9, slst to top of first sc at beg of round to join. — 8 ch9 sps
Round 6: Slst into first ch9 sp, ch1, 9sc in same ch9 sp, *9sc in next ch9 sp. Rep from * around, slst to top of first sc at beg of round to join. — 72 scs
Round 7: Beg 3dc-cl over first 3 sts, ch3, *3dc-cl over next 3 sts, ch3. Rep from * around, ch3, slst to top of first cl-st at beg of round to join. — 24 cl sts
Round 8: Ch3 (counts as first dc), (1dc, ch2, 2dc) in same st, sc in next ch2 sp, (2dc, ch2, 2dc) in next st, sc in next ch2 sp. Rep from * around, slst to top of ch3 at beg of round to join. — 24 ch2 sps
Round 9: Rep round 4. — 24 ch2 sps
Round 10: Slst across and in to first ch2 sp, ch1, sc in same sp, *ch9, sc in next ch2 sp. Rep from * around, except on last repeat replace last sc with slst to top of sc at beg of round to join. — 24 ch9 sps
Round 11: Rep round 6. — 24 ch9 sps
Round 12: Rep round 7. — 72 cl-sts
Round 13: Rep round 3. — 36 ch2 sps
Round 14: Rep round 4. — 36 ch2 sps
Round 15: Rep round 5. — 36 ch9 sps
Round 16: Rep round 6. — 324 scs
Round 17: Rep round 7. — 108 cl sts
Round 18: Ch3 (count as first dc), (1dc, ch2, 2dc) in same st, sc in next ch2 sp, (2dc, ch2, 2dc) in next ch2 sp, sc in next ch2 sp, *(2dc, ch2, 2dc) in next st, sc in next ch2 sp, (2dc, ch2, 2dc) in next ch2 sp, sc in next ch2 sp. Rep from * around, slst to top of ch3 at beg of round to join. — 72 ch2 sps
Round 19: Rep round 4. — 72 ch2 sps
Round 20: Rep round 5. — 72 ch9 sps
Round 21: Rep round 6. — 648 scs
Round 22: Rep round 7. — 216 cl sts
Round 23: Slst into first ch3 sp, ch3 (counts as dc), (1dc, ch2, 2dc) in same sp, sc in next ch2 sp, *(2dc, ch2, 2dc) in next ch2 sp, sc in next ch2 sp. Rep from * around, slst to top of ch3 at beg of round to join. — 108 ch2 sps
Round 24: Rep round 4. — 108 ch2 sps
Fasten off.
Finishing:
Weave in loose ends. Hand wash. Block to finished measurements and allow to dry.
Assembly:
Determine the Size of the PEX Frame
After washing and blocking the crochet motif, allow it to dry completely and measure its finished diameter.
Because the PEX tubing is 1/2 in (1.3 cm) thick, add 1 in (2.5 cm) to the diameter of the crochet motif to determine the outside diameter of the frame. This accounts for 1/2 in (1.3 cm) of tubing on each side of the circle.
For the 48 in (121.9 cm) diameter Sea Glass Sanctuary motif:
48 in + 1 in = 49 in frame diameter
Next, calculate the circumference of the frame by multiplying the frame diameter by π (3.1416):
49 × 3.1416 = 153.94 in
Round to approximately 154 in (391 cm) of PEX tubing.
For a different size motif, use the same formula:
Blocked motif diameter + 1 in = frame diameter
Frame diameter × 3.1416 = length of PEX tubing to cut
Measure and mark the PEX tubing before cutting. For the cleanest and easiest cut, use a PEX or tubing cutter. A fine-tooth saw can also be used; secure the tubing before cutting and smooth any rough edges afterward.
Tip: Before cutting, remember that the coupling joins the two ends of the tubing and may slightly affect the final circumference. If necessary, test-fit the tubing and coupling and make small adjustments before permanently assembling the frame.
Assemble the PEX Frame
Insert one end of the PEX tubing firmly onto one side of the 1/2 in coupling. Bend the tubing gradually into a circle, then insert the opposite end onto the other side of the coupling.
Push both ends securely onto the coupling until the connection is snug and the circle is closed.
Lay the frame on a flat surface and gently adjust it until the circle is as even and symmetrical as possible.
Attach the Crochet Motif to the Frame
Cut a long length of matching yarn and thread it onto a yarn needle.
Position the blocked crochet motif inside the PEX circle, centering it as evenly as possible. It can be helpful to temporarily secure the motif to the frame at several evenly spaced points around the circle before beginning the final wrapping.
Beginning at one ch-2 space along the outer edge of the motif, pass the yarn through the ch-2 space and wrap it securely around the PEX tubing.
Continue wrapping the yarn around the PEX tubing only 9 times between each ch-2 space. At the next ch-2 space, pass the yarn through the space and around the tubing to secure the motif to the frame.
Repeat this process around the entire circumference:
Attach through ch-2 space, wrap PEX tubing 9 times, attach through next ch-2 space.
Keep the tension firm and consistent as you work. The motif should stretch evenly toward the frame without distorting the circular shape.
The additional wraps between attachment points serve two purposes: they secure the crochet motif to the frame and gradually cover the visible PEX tubing with yarn, creating a more cohesive finished appearance.
Continue around the entire frame, adjusting the motif as necessary to maintain even tension and spacing.
When you return to the beginning, secure the yarn firmly and weave in the remaining end.
Gently adjust the motif and frame one final time so the crochet is centered, evenly tensioned, and the frame maintains a smooth circular shape.
About Kristin Omdahl
 Kristin Omdahl is an author, designer, and lifelong maker with over 20 years of experience creating crochet and knit patterns, books, and tutorials. With more than 1,000 designs published worldwide, her work blends creativity, technique, and a love of storytelling.
She is also the author of The Sea Glass Journal, a novel that weaves together themes of creativity, self-discovery, and coastal living—often inspiring the patterns, recipes, and projects she shares.
Explore more patterns, tutorials, and the world of The Sea Glass Journal at KristinOmdahl.com.
