
Free Bag Pattern, Free Pattern, Free Worsted Weight Yarn Pattern
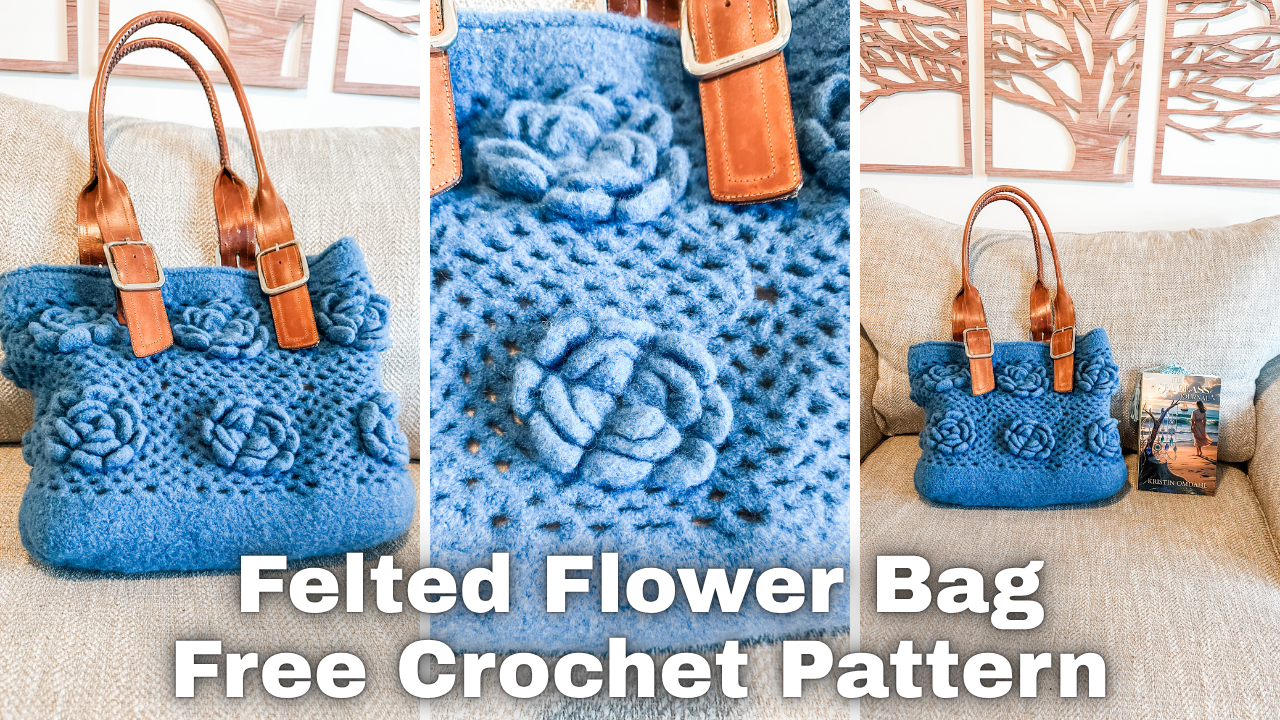
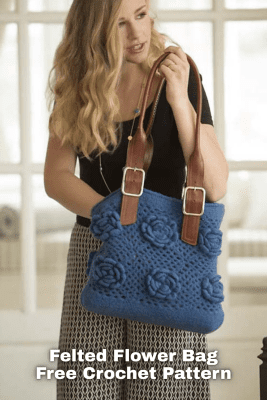
Felted Flower Bag | Free Crochet Pattern
Apr
There are some designs that stay with you.
I saw a laser-cut leather bag in a department store years ago—and couldn’t stop thinking about it.
Not because I wanted to buy it… but because I wanted to figure out how to recreate that look in crochet.
This felted flower bag is what came from that idea: a sturdy, sculptural bag with a lace-like structure that transforms completely in the felting process.
That curiosity led to this design: a crochet bag worked in wool and then felted to create a sturdy, sculptural fabric, finished with dimensional floral motifs framed in crochet mesh that echoes the look of intricate cutwork.
I first designed this felted flower bag back in 2015 for my book Crochet So Lovely, drawn to the way structure and softness could exist together in one piece, and wondering how I could recreate that feeling with yarn.
Over the years, I’ve made 1,000+ designs… but this is one of the few samples I’ve held onto through every move and season of life. And looking at it now, I see it differently than I did then.
Today, I’d style it with more minimal leather handles for durability, add a structured insert for everyday function, and choose from the wide range of felting-friendly wool yarns that are so easy to find now. The bones of the design are still the same, but how we use and live with our handmade pieces evolves.
This is the kind of bag that feels like it already has a story before you even use it—sturdy, textured, and meant to carry the things that matter.
I imagine it filled with yarn, a sketchbook, or a well-loved journal… the kind of everyday pieces that shape the quiet, creative moments in the world of The Sea Glass Journal.
Because in that world, and in real life, it’s often the small, handmade things that hold the biggest stories.
When I wrote The Sea Glass Journal, I didn’t set out to connect it to my past crochet designs. But so many of them, like this one, carry the same themes: texture, detail, intention, and the beauty of things made slowly by hand. Pieces that feel like they belong near the coast… tucked into a quiet, meaningful life.
This bag has become one of those pieces for me.
It’s not just something I made—it’s something I’ve carried.
About the Pattern
This is a felted crochet bag made with 100% wool yarn, designed to transform through the felting process into a dense, durable fabric. The floral motifs are joined before felting, and the base is crocheted right onto the tube of joined motifs. Once felted, the bag transforms into a dimensional, lace-inspired fabric reminiscent of the original leather bag that inspired it.
In this updated version, I’ve included notes for:
- Yarn substitutions using readily available wool yarns
- Optional leather handles for added strength and style
- Using a bag insert to create structure and organization inside
A Note on Felting
Felting is what gives this bag its structure and strength. If you’ve never felted before, don’t worry—it’s a simple process that transforms your crochet fabric into something completely different: thicker, sturdier, and beautifully cohesive.
Make It Your Own
Whether you carry it to the beach, the market, or tuck a favorite book inside (I know what I’d choose), this bag is meant to be used and lived in.
Because the things we make, and the things we carry, become part of our story.
Felted Flowers Bag | Free Crochet Pattern
What you will need:
- 660 yds #4 worsted weight, 100% pure wool yarn
- I/9 (5.5mm) crochet hook
- Yarn needle
- Scissors
- Purse Handles
- Contrast cotton yarn
Gauge:
Motif: 8 in (20.5cm) square, before felting
Motif: 5 in (12.5cm) square, after felting
Finished size:
15 in (38cm) wide x 3 in deep (7.6cm) x 13 in (33cm) tall , excluding strap
Stitch Guide:
Double Crochet 5 Together (dc5tog): (yo, insert hook in next st, yo, draw yarn through st, yo, draw yarn through 2 loops on hook)x5, yo, draw yarn thorugh 6 loops on hook.
4 Double Crochet Cluster (4dc-cl): (yo, insert hook in next st, yo, draw yarn thorugh sp, yo, draw yarn through 2 loops on hook)x2 in same sp, (yo, insert hook in next sp, yo, draw yarn through st, yo, draw yarn thorugh 2 loop son hook)x2 in next sp, yo, draw through all 5 loops on hook.
Instructions:
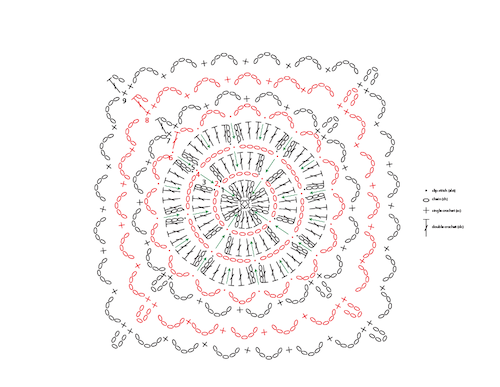
 First Motif:
Ch4, slst to 4th ch from hook to form ring.
Round 1 (Right Side): *Ch3, (3dc, ch3, slst) in ring. Rep from * 3 more times. — 4 petals
Round 2: *Ch5, working behind petal, slst in next slst, rep from * around. — 4 ch5 sps
Round 3: *(Slst, ch3, 6dc, ch3, slst) in ea ch5 sp around. — 4 petals
Round 4: *Ch5, working behind petals, skip next 3 dc sts, slst in ch5 sp in round 2, ch5, skip remainder of same petal, slst in next slst. Rep from * around. — 8 ch5 sps
Round 5: *(Slst, ch3, 6dc, ch3, slst) in ea ch5 sp around. — 8 petals
Round 6: *Ch5, working behind petal, skip next 3 dc slst in ch5 sp on round 4, ch5, skip remainder of same petal, slst in next slst. Rep from * around., — 16 ch5 sps
Round 7: Ch1, sc in first sp, *(ch5, sc) in ea of next 3 ch5 sps, ch5**, (sc, ch5, sc) in next ch5 sp; rep from * around, ending last rep at **, sc in beg ch sp, ch2, dc in first sc (ch2, dc) counts as last ch5 sp. — 20 ch5 sps
Round 8: Ch1, sc in first sp, *(ch5, sc) in ea of next 4 ch5 sps, ch5**, (sc, ch5, sc) in next ch5 sp. Rep from * around, ending last rep at **, sc in beg ch sp, ch2, dc in first sc (ch2, dc) counts as last ch5 sp. — 24 ch5 sps
Round 9: Ch1, sc in first sp, *(ch5, sc) in ea of next 5 ch5 sps, ch5**, (sc, ch5, sc) in next ch5 sp; rep from * around, ending last rep at **, sc in beg ch sp, ch2, dc in first sc (ch2, dc) counts as last ch5 sp. — 28 ch5 sps
Fasten off.
Second and Successive Motifs (joined on 1 side):
Rounds 1 – 8: Work same as First Motif through round 8.
Round 9: Ch1, sc in first sp, (ch5, sc) in ea of next 5 ch5 sps, ch5, (sc, ch2, slst in corner ch5 sp of previous motif, ch2, sc) in next ch5 sp, ch2, slst in next corresponding ch5 sp of previous motif, ch2, sc in next ch5 sp of current motif)x6, ch2, slst in next corner cht sp, ch2, sc in same corner ch5 sp of current motif, *ch5, sc in ea of next 5 ch5 sps, ch5**, (sc, ch5, sc) in net ch5 sp, rep form * around, ending last rep at **, sc in beg ch sp, ch2, dc in first sc (ch2, dc) counts as last ch5 sp).
Fasten off.
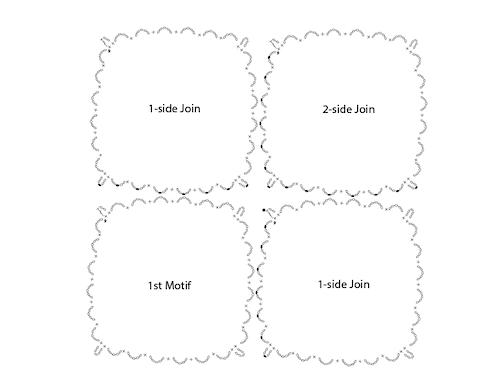
Successive Motifs (joined on two opposite sides):
Rounds 1 – 8: Work same as First Motif through round 8.
Round 9: Ch1, sc in first sp, (ch5, sc) in ea of next 5 ch5 sps, ch5, *(sc, ch2, slst in corner ch5 sp of previous motif, ch2, sc) in next ch5 sp, ch2, slst in next corresponding ch5 sp of previous motif, ch2, sc in next ch5 sp current motif)x6, ch2, slst in next corner ch5 sp, ch2, sc in same corner ch5 sp of current motif*, (ch5, sc) in ea of next 5 ch5 sps, ch5, rep from * to * once joining to First Motif, ch2, slst in next corner ch5 sp of First Motif, ch2, join with slst in first sc.
Successive Motifs (joined on two adjacent sides):
Rounds 1 – 8: Work same as First Motif through round 8.
Round 9: Ch1, sc in first sp, (ch5, sc) in ea of next 5 ch5 sps, ch5, (sc, ch2, slst in corner ch5 sp of previous motif, ch2, sc) in next ch5 sp, *ch2, slst in next corresponding ch5 sp of previous motif, ch2, sc in next ch5 sp of current motif)x6, ch2, slst in next corner ch5 sp, ch2, sc in same corner ch5 sp of current motif; rep from * once, **(ch5, sc) in ea of next 5 ch5 sps, ch5***, (sc, ch5, sc) in next ch5 sp; rep from * around, ending last rep at **, sc in beg ch sp, ch2, dc in first st (ch2, dc) counts as last ch5 sp).
Fasten off.
Successive Motif (joined on three adjacent sides):
Rounds 1 – 8: Work same as First Motif through round 8.
Round 9: Ch1, sc in first sp (ch5, sc) in ea of next 5 ch5 sps, ch5, (sc, ch2, slst in corner ch5 sp of previous motif, ch2, sc) in next ch5 sp, (ch2, slst in next corresponding ch5 sp of previous motif, ch2, sc in next ch5 sp of current motif)x6, ch2, slst in next corner ch5 sp, ch2, sc in same corner ch5p of current motif; rep from * twice, (ch5, sc in ea of next 5 ch5 sps, ch5, sc in eg ch sp, ch2, dc in first sc (ch2, dc) counts as last ch5 sp.
Fasten off.
Top Band:
Round 1: With RS facing, join yarn with slst in any corner join on top edge of tube, *work 4dc-cl over each corner join, placing 2 points of cluster in ea side of corner join, 4dc in ea ch5 sp; rep from * around, join with slst to top of beg ch3 sp. — 150 sts
Rounds 2 – 3: Ch3 (counts as dc), 1dc in ea st around, slst to top of ch3 at beg of round to join.
Round 4: Slst in ea st around, join with slst in first slst.
Fasten off.
Botton Band and Base:
Round 1: With RS facing, join yarn in first ch5 sp to the left of any junction (join) between motifs on bottom edge of tube, ch3 (3dc in same sp, 4dc in ea ch5 sp to next junction between motifs, *work 4dc-cl over corner join placing 2 points of cluster in ea side of corner join; rep from * around, slst to top of ch3 at beg of round to join.. — 150 sts
Rounds 2 – 4: Ch3 (counts as dc), 1dc in ea st around, slst to top of ch3 at beg of round to join. — 150 sts
Round 5: Ch3 (counts as dc), dc5tog over next 5 sts, dc in ea of next 64 sts, dc5tog over next 5 sts, dc in next st, dc5tog over next 5 sts, dc in ea of enxt 64 sts, dc5tog over last 5 sts, slst to top of ch3 at beg of round to join. — 134 sts
Round 6: Ch3 (counts as dc), dc5tog over next 5 sts, dc in ea of next 56 sts, dc5tog over next 5 sts, dc in next st, dc5tog over next 5 sts, dc in ea of next 56 sts, dc5tog over last 5 sts, slst to top of ch3 at beg of round to join. — 118 sts
Round 7: Ch3 (counts as dc), dc5tog over next 5 sts, dc in ea of next 48 sts, dc5tog over next 5 sts, dc in next st, dc5tog over next 5 sts, dc in ea of next 48 sts, dc5tog over last 5 sts, slst to top of ch3 at beg of round to join. — 102 sts
Round 8: Ch3 (counts as dc), dc5tog over next 5 sts, dc in ea of next 40 sts, dc5tog over next 5 sts, dc in next st, dc5tog over next 5 sts, dc in ea of next 40 sts, dc5tog over last 5 sts, slst to top of ch3 at beg of round to join. — 86 sts
Round 9: Ch3 (counts as dc), dc5tog over next 5 sts, dc in ea of next 32 sts, dc5tog over next 5 sts, dc in next st, dc5tog over next 5 sts, dc in ea of next 32 sts, dc5tog over last 5 sts, slst to top of ch3 at beg of round to join. — 70 sts
Turn bag inside out. Flatten bag. With Wrong Side (WS) facing, working through double thickness, slst across bottom of the bag.
Fasten off. Weave in ends.
Finishing:
Using scrap cotton yarn, slst around top opening of bag, then slst both thicknesses together. This prevents the top from felting unevenly adn also prevents it from felting together in the process. Once the bag is dry, you coan unreavel it back out. If you have any problems, you can always use a seam ripper or sharp scissors to remove the slst row.
Felting:
Place bag in the washing machine set for hot water with soap, set for low water setting, adn start the wash. If you ahve a top loader, you coan check on it often. Otherwise you may be unable to stop the process if you think it goges too far. Some people like to stop the process prematurely. I let the wash cycle complete and didn’t remove it early.
Find a box or form that closely fits the shape of your bag. I used a 9 in (23cm) x 14 in (35.5cm) box. Ivert the bag over the box and let it dry overngiht.
Sew handles to each side of the bag.
Love this pattern?
Browse More Crochet Shawl Patterns HERE
Subscribe to my newsletter for weekly free patterns, video tutorials, and creative inspiration.
Kristin Omdahl patterns, books, handouts and videos are for your personal use only; additional, up to 10 items can be made to sell from one design. Commercially produced products made from my instructions are prohibited. All Kristin Omdahl patterns, books, handouts and videos are licensed for single use and remain the intellectual property of Kristin Omdahl. This pattern may not be reproduced or transmitted in any form or by any means, electronic, mechanical, photocopying, recording or otherwise.
©Copyright 2026 All Rights Reserved
About Kristin Omdahl Kristin Omdahl is a bestselling author, designer, and creative entrepreneur known for her “sensory storytelling” — weaving food, craft, and nature into unforgettable fiction and non-fiction. Her debut novel, The Sea Glass Journal, is a love letter to Florida’s Gulf Coast, exploring themes of healing, connection, and creative legacy.
When she’s not writing, Kristin shares crochet and knitting designs, recipes, and behind-the-scenes glimpses of her creative process with her global community on Patreon.
Discover More by Yarn Weight
Explore all pattern categories by yarn weight: