
Crochet, Free Crochet Pattern, Free Lace Fingering Yarn Pattern, Free Pattern, Video
Fine Celebration Crochet Poncho Free Pattern
Aug
Fine Celebration Crochet Poncho
by Kristin Omdahl
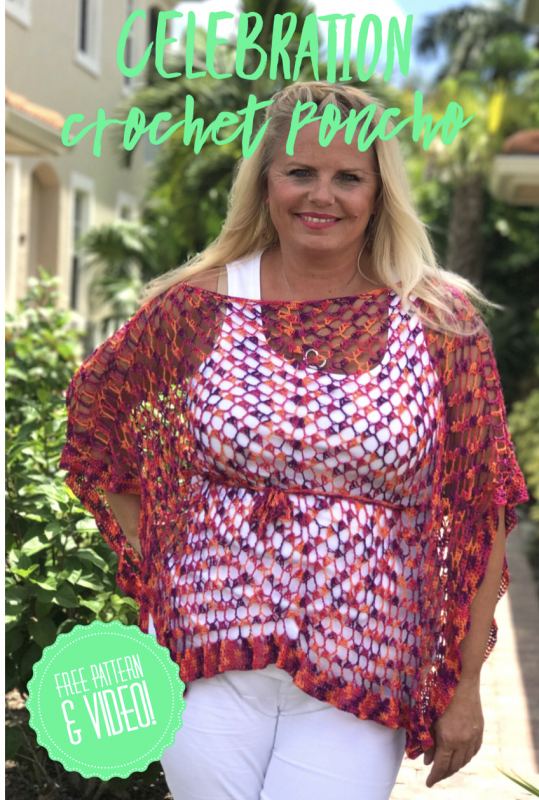
This is such a popular silhouette and for good reason! The peekaboo crochet poncho is figure flattering, can be worn in a variety of ways, and for a variety of occasions. Dress it up for a night on the town with a monochromatic silhouette of strappy tank and slim pants or take it to the beach for the cutest coverup under the sun! This stunner is worked identically on both sides. Each side starts with a large triangle to which two smaller triangles are added at either side to form a rectangle. Wear it front to back, side to side, belted, or with ties laced up the sides for kimono sleeves (this option can be side to side or front to back as well). The possibilities are endless!
What you will need:
(2) balls Be So Fine Yarn; shown in color Sangria
E/4 (3.5mm) crochet hook

#1 Fingering Weight Yarn
Gauge: 11 dcs and 15 rows = 4” after blocking
Take time to check your gauge
Finished size:
Width of front at lower edge: approx 31”
Length from center back neck: approx 20”
NOTES:
*For both front and back, start with the large triangle (worked from the neck down).
*Two small triangles are joined as you go to either side of the lower “v” of the large triangle. This creates a rectangle.
*Join the front rectangle to the back rectangle and then work the double crochet edging around the whole piece.
Instructions:
Center (large) triangle:
Row 1: Ch4 (counts as beg ch and dc), work 8dc in 4th ch from hook. Turn.
Row 2: ch7 (counts as dc, ch4), dc in first st, ch4, skip 2 sts, dc in sp before next st, ch4, skip 3 sts, dc in sp before next st, ch4, (dc, ch4, dc) in last st. Turn.
Row 3: Ch3 (counts as dc), (3dc, in next ch4 sp)x2, 9dc in next (center) ch4 sp, (3dc in next ch4 spx2, dc in last st. Turn.
Row 4 (and all even numbered rows): Ch7 (counts as dc, ch4), dc in first st, ch4, skip 3 sts, dc in sp before next st, *ch4, skip 3 sts, dc in sp before next st; rep from * across, end ch4, dc in last st. Turn.
Row 5: Ch3 (counts as dc), *3dc in next ch4 sp; rep from * to center ch4 sp, 9dc in center ch4 sp, *3dc in next ch4 sp; rep from * to end, dc in last st.
Rows 6 – 32: rep rows 4 – 5 thirteen more times, then rep row 4 once more and continue to increase in pattern as established, working one more repeat at ea corner and 2 more repeats in center “v”. Fasten off.
Side (small) triangle:
NOTE: Along one side of large triangle, mark the center ch4 sp. There should be 16 ch4 sps either side of the marker.
Row 1: Join with slst to center marked ch4 sp, ch3, slst in ch4 sp to the right, work 9dc in first (beg) slst sp, slst in ch4 sp to the left.
Row 2: Ch3 (counts as dc), slst in next ch4 sp on large triangle, ch4, turn, dc in sp before last dc worked on previous row, (ch4, skip 3 sts, dc in sp before next st)x3, ch4, slst in next ch4 sp on last row of large triangle.
Row 3: Ch3 (counts as dc), slst in next ch4 sp on last row of large triangle, turn, (work 3dc in next ch4 sp on previous row)x2, 9dc in next (center) ch4 sp, (3dc in next ch4 sp)x2, dc in last st, slst in next ch4 sp on last row of large triangle.
Row 4: Ch3 (counts as dc), slst in next ch4 sp on large triangle, ch4, turn, dc in first dc on prvious row, (ch4, skip 3 sts, dc in sp before next st)x7, ch4, slst in next ch4 sp on last row of large triangle.
Row 5: Ch3 (counts as dc), slst in next ch4 sp on last row of large triangle, turn ,(work 3dc in next ch4 sp)x4, 9dc in next (center) chr sp, (3dc, in next ch4 sp)x4, dc in last st.
Row 6: Ch3 (counts as dc), slst in next ch4 sp on large triangle, ch4, turn, dc in first dc on previous row, (ch4, skip 3 sts, dc in sp before next st)x11, ch4, slst in next ch4 sp on last row of large triangle.
Row 7: Ch3 (counts as dc), slst in next ch4 sp on last row of large triangle, turn, (work 3dc in next ch4 sp)X6, 9dc in next (center) ch4 sp, (3dc in next ch4 sp)X6, dc in last st, slst in next ch4 sp on last row of large triangle.
Rows 8 – 16: rep rows 6 – 7 four times, then row 6 once more, increasing by 2 reps ever 2 rows. Fasten off.
Make a second side (small triangle on other side of large triangle but do NOT fasten off. **
Edging Round: Working along edge of rows of large triangle, ch3 (counts as dc), work 6 more dcs in same large ch sp, *2dc in next dc end of row, 3dc in next ch3 end of row; rep from * across to last large ch sp, work 7dc in sp, turn, working along edge of smaller triangle, work 3dc in ea ch sp across to corner, work 9dc in corner, work 3dc in ea ch sp across to end of smaller triangle, work 5c in exposed ch sp of large triangle, work 3dc in ea ch sp across to corner of second smaller triangle, work 9dc in corner, work 3dc in ea ch sp across to end of smaller triangle, join with slst to ch3 at beg of roudn to join. Fasten off.
BACK:
Work same as front up to **. Edge round is not worked until joining to front.
Joining front to back:
NOTE: Working along top edge of back, large chains and slst to adjacent sts on front will join the front to the back and teh shoulders. The edge round will be worked at the back neck and other side edges as for front. Mark the center 55 dcs on front for neck.
Shoulder joining:
Round 1: Working along top edge of back, ch3 (counts as dc), dc in same sp, *ch5, slst to adjacent st on front, ch5, dc in sp on back; rep from * to first neck marker, work slst in ea dc on front piece and 2dc in every dc end of row, 3dc in every ch3 end of row, as in the eding round, end with a slst in front piece and ch5, work dc only, as in edge round, along center back neck rows, then join shoulder on 2nd half as before, continue the edge roudn along the side edges of the small triangles and the center point as for front. Do not fasten off.
Round 2: Working along perimeter of entire garment, (each side and lower edge of front and back), ch3 (counts as dc), work 10dc along edge of shoulder join (dc, ch5, dc), work 1dc in ea st across to corner, 3dc in corner, work 1dc in ea st across lower edge to coerner, 3dc in corner, work 1dc in in ea st across side edge and 11 sts along edge of shoulder join (dc,c h3, dc), continue to work 1dc in ea st across side edge to corner, 3dc in corner, work 1dc in ea st across lower edge to corner, 3dc in corner, complete side edge with 1dc in ea st around to beg of round. Join with slst to top of ch3 to join.
Rounds 3 – 4: Ch3 (counts as dc), work 1dc in ea st around, except work 3dc in ea of 4 corners, join with slst to top of ch3 at beg of round to join.
BELT (optional):
Row 1: Ch4, 3tr in 4th ch from hook.
Row 2: slst into sp between 2nd and 3rd sts, ch4, 3tr in 4th ch from hook.
Rep row 2 until belt is 60” long. Slst into sp between 2nd and 3rd sts. Fasten off.
TIES (optional):
Join with slst to any of the four perimeter corners (right front, right back, left front, left back), and chain until you have 18″ long. Fasten off. Repeat for remaining corners. When tied together or laced up sides and tied together, they create “kimono sleeve shaping” to this otherwise unstructured poncho.
Weave in loose ends. Hand wash, block to finished measurements and let dry.
Kristin Omdahl patterns are for your personal use only and not to be used to create items for commercial gain. All Kristin Omdahl patterns are licensed for single use and remain the intellectual property of Kristin Omdahl. This pattern may not be reproduced or transmitted in any form or by any means, electronic, mechanical, photocopying, recording or otherwise.
©Copyright 2017, All Rights Reserved
Thank you for choosing to knit and crochet Kristin Omdahl patterns!
I know that you have thousands of choices for buying yarn and body care products. I want you to know what makes MY products special, and feel good about shopping the Kristin Omdahl brand.
Shop Kristin Omdahl Yarns HERE
Shop Kristin Omdahl Crochet Patterns HERE
Shop Kristin Omdahl Knitting Patterns HERE
I would love to see your creations. Just as much fun as making these myself is the satisfaction I get from seeing my designs come to life and other crochet fans wearing them too. There are now 2 ways you can share what you have done!
- Share yours by joining Create. Share. Inspire on Facebook where you can interact with me as well as many other members who have a love of knitting and crochet just like you! It is a wonderful and safe place to share your photos of finished projects in my knitting or crochet patterns or yarns, and to see what others are making, too.
- I have recently added a wonderful new interactive section to the website which I invite you to take part in, it has been a smashing success and such fun so far. It is the new “Share Your Project” section. You, my creators, can upload images and descriptions of your creations to share with the ever growing community! To upload simply click here.
Additionally, I host a livestreaming podcast weekday on my YouTube Channel called Create Share Inspire Podcast. You can join the audience and even ask me questions LIVE! I often do a show and tell, or quick demo and I always interact with the live audience. It is a lot of fun!
You can browse through over 800 previously recorded episodes HERE: Create Share Inspire Podcast Playlist . Make sure to subscribe to my YouTube Channel to get reminders when the next episode airs LIVE.
I look forward to seeing what you create!
xoxo,
Kristin
You could also weave the tie through the sleeve for a gathered look to shorten the sleeve on a hot day. Or weave the ties through the front below the neckline to gather that area.
Absolutely!